UNDERSTANDING SURF FORECASTS

understanding wave forecasts

UNDERSTANDING SURF FORECASTS

Decades have passed since surf travel has required reading nautical charts, packing weather radios, and crossing your fingers that your destination had some trace of swell. Gone are the days of surf exploration, where any hidden stretch of coastline could possess the often sought after—yet rarely found—perfect wave. Today, we open our phones and we are able see what the surfs doing anywhere in the world in a matter of seconds.

Regardless of the local of your session, surf trip or not, getting skunked burns the same. Surf and weather forecasting might be the most advanced it has ever been, but it will do no good if you’re not quite sure how to read a forecast. Can you say without a shred of doubt that you understand the relationship between swell interval and wave size? Do you know what swell directions the best for your local break?

Can you track a swell originating halfway around the world until it makes landfall on your coast? At Swell Surf Camp, we want you to prepared and knowledgeable surfers, whether you’re surfing at our Caribbean surf resort, or at your home break. Keep reading to learn how to read and interpret surf forecasts and you’ll be sure to score on your next trip down the coast or across the world.

WAVE HEIGHT

Wave height, it’s pretty self explanatory . Simply put, it is the height of the wave. Understanding the mix of variables that affect a wave’s height will improve a surfer’s ability to read a forecast, and ultimately lead to catching more waves. First, it is important to know that the forecasted wave height, and the height of a wave’s face are typically different. Waves are measured from the top of the peaking swell, which is not the same thing as the face. So, a 2-foot forecast on an offshore day, with the right ocean floor contour, can produce a 3 to 5-foot face.

The forecast might read 2-3 feet, but the waves face could easily be head high.

wave height surf

SWELL INTERVAL

Failure to comprehend and properly read swell interval can lead to missing a solid surf session. Swell interval is defined as the time that passes between two waves, typically measured in seconds. Swell interval has a direct relationship to wave size in that a long interval will produce larger surf.

The concept is simple. If a wave has a long interval, it has more time to build in size. Thus, along swell interval or period —as it is often called— will create bigger surf than a short interval on with the same size swell. Longer interval swell will also produce more powerfull breaking waves.

SWELL DIRECTION

Swell direction is another term with a self-explanatory title, it is simply the direction of the incoming swell. A swell’s direction is categorized by the direction the swell is traveling from, rather than the direction of that swells trajectory.

A swell traveling from south to north would be labeled as a south swell. How swell direction affects wave quality depends what direction the coast/ break is facing and the wind direction. If a beach is facing southwest and the incoming swell is a northwest swell, the resulting conditions will most likely be choppy.

The most common Swlel direction on the North Coast of the Dominican Republic is North East, but in winter time when stronger storms are off the coats of New Work it will send waves down to the North Coast of the DR in a good North Swell. A typical North Swell in The DR will be 6 foot in height with a 13+ second interval, resulting in waves overhead to double overhead in Cabarete

WIND DIRECTION

Wind direction will always make the difference between average waves and great waves. If the wind is blowing onshore (towards the beach) it will flatten waves and cause chop. If the wind is blowing cross shore, it will create shop and poor wave conditions.

If the wind is blowing offshore, however, it will prop up the face of the wave and create clean surf conditions.

WIND SPEED

Regardless of what direction the wind is blowing, high wind speeds will create more difficult surfing conditions. A gentle wind is an ideal scenario for surfing. If the wind is blowing onshore, but only at a speed of 3 or 4 mph, then the conditions will most likely still be clean.

Even if the wind is directly offshore, high wind speeds will make it difficult to drop into waves.

TIDE

While some breaks work at all tides, not all breaks are created equal. In the same vein, some breaks work well at high tide and others exclusively at low tide. The deciding factor has to do both with swell/ wave size and the ocean floor contour.

For example, certain reef breaks may only be safe to ride at high tide because the reef could be exposed or too shallow at low tide. Similarly, some sand bars may be too deep to effectively cause waves to break during high tide, but they may work well during low tide.

Fortunatly for us, there’s very little tidal change on the beaches of the North Coast, so you can surf in all tides

VIDEO EXPLAINING THE DIFFERENT ELEMENTS

YouTube video

WAVE TYPE

While the wave type of any given break does not fluctuate and is not technically part of your daily surf forecast, it is usually included in a small section to help you better comprehend how the wave breaks on any given day.

There are three main wave types: beach break, reef break, and point break. Each wave type can produce a left, a right, or an “A-frame” depending on the set up of the break.

BEACH BREAK

A beach break is the ideal learning setting for any beginner surfer. Beach breaks have sand floors, meaning that they have surfers who hit the bottom have a low risk of injury. Waves break over sand bars (rather than reefs), which can shift significantly during a day creating several peaks.

Additionally, wave energy pounds into the sand and has nowhere to go but up and out, which creates an arduous paddle out during a large swell.

REEF BREAK

A reef break is any wave that breaks over some type of submerged rock formation. There are a variety of types of reef breaks, some of which are beginner/ intermediate friendly and some of which that are advanced only.

SUBMERGED REEF

A submerged reef break is the only variety that could be considered beginner to intermediate friendly. While every beginner surfer should start out on a beach break, once they have mastered the pop-up and are able to successfully ride down the line at will, riding a submerged reef break is not out of the question.

A submerged reef break is not a live coral reef, the ocean floor is made up of rock that has been covered by sand. While you don’t’ necessarily want to get slammed into a submerged reef, you won’t hurt yourself by walking on it.

CORAL REEF

Coral Reefs are, are full of, living organisms. Coral is sharp, simply stepping on coral can cause injury. Additionally, many coral reefs can be full of sea urchins that’ll ruin any surfer’s day. Coral reefs, regardless of the depth of water at the break, should only be surfed by intermediate to advanced surfers.

ROCK REEF

Similarly, rock reefs can put a serious damper on your day if you come into contact with them during a wipeout. While the rocks may not be sharp (they often are though), they may still be riddled with sea urchins just waiting to impale you. Depending on the depth of water over the reef, rock reefs should only be ridden by intermediate to advanced surfers.

POINT BREAK

Point breaks cater to surf progression. Point breaks are generally slow breaking, mellow rides that often offer up ideal sections for carving and turning. A point break is caused by an obtrusive land or underwater mass—often rock— that runs perpendicular to the wave/shoreline.

The protruding mass will cause the peak of the break to present itself at roughly the same place every single wave, which can crowd the lineup, but offers workable sections for intermediate surfers looking to improve.

Armed with the newfound knowledge of an amateur meteorologist, you are ready to take to the sea, plan your next surf trip to Swell Surf Camp, or drive down to the coast to catch some waves!

WAVE FORECASTS FOR THE DOMINICAN REPUBLIC

The surf forecasts we use the most in Cabarete are and Windguru (opens new window) which is very reliable for wave and wind forecasts for surfers and kitesurfers.

In need of good waves?

At Swell we provide Learn how to surf holidays for people that have never surfed before as welll as a great social place to stay for advanced and expert surfers looking for a cool, comfortable & social place to stay. We offer full packages which include:

  • Airport transfers
  • Breakfast and 4 dinners
  • Comfortable & stylish accommodation
  • surfboard rentals and surf transport
  • A great social vibe

  We hope to see you in the Dominican republic soon

Share on Facebook

SURF STANCE

surfing stance

SURF STANCE

The technique behind the perfect surf stance


Goofy or Regular

Let’s talk about surf stance! The term Goofy foot came into existence after Goofy, a character in Walt Disney movie, surfed by putting his right foot forward, unlike the majority of surfers that put their left foot forward when surfing. This cartoon character was a left-hander and seems to prefer goofy surf stance, so now you understand.

Avoid assuming that being a left-hander automatically makes you a goofy footer or being a right-hander automatically makes you a natural footer. This is a generalization because there is no absolute rule about it.

Are you a goofy or natural footer?

In case you are enthusiastic about skateboarding or snowboarding, the same thing is applicable to surfing. If you have no experience with skateboarding or snowboarding then assume that you are moving swiftly on the ice and about to slide, which of your feet would be put forward as you slide?

surf stance

When sliding,  you will experience a certain comfort zone in a particular position over another. In one position, you will experience stability and strength while you will feel awkward and uncertain in the other.

For better utilization of your water time, understand your stance in advance. There is no need for you to waste good waves on understanding something you are capable of learning from the comfort of your home.

However, the position of your front foot and back foot on the surfboard is not the only thing to know about surfing stance.

Your turns, acceleration, balance as well as general maneuvering display when you are on the wave will be greatly improved if you can adopt an optimum stance while you are on the surfboard.

A low surf stance will assist you in maintaining your balance if you are new to surfing.

However, you should avoid going too low.
As they are catching their first waves, inexperienced surfers are advised to ensure that their feet are kept shoulder-width apart. Simultaneously, they should bend their knees for impact absorption and keep their hands close to the rails of the boards or, at the minimum, at the waist level.
It is essential for people that are new to surfing to understand the appropriate surfing stance before getting into the waves.

Through optimization of weight distribution and adjustment of the body to the regular morph of the wave, new territories in wave riding will be seamlessly unlocked by an appropriate surf stance.

The right placement of your feet on the surfboard is the first step to a good body position.
In case your position is too distanced on the tail, you will end up miring the surfboard, slacking off and ultimately blotting out.
As a basic guideline, the surfer should place his feet over the stringer and focus on the board’s width.

Steer Clear of the Poo Stance
poo surf stance
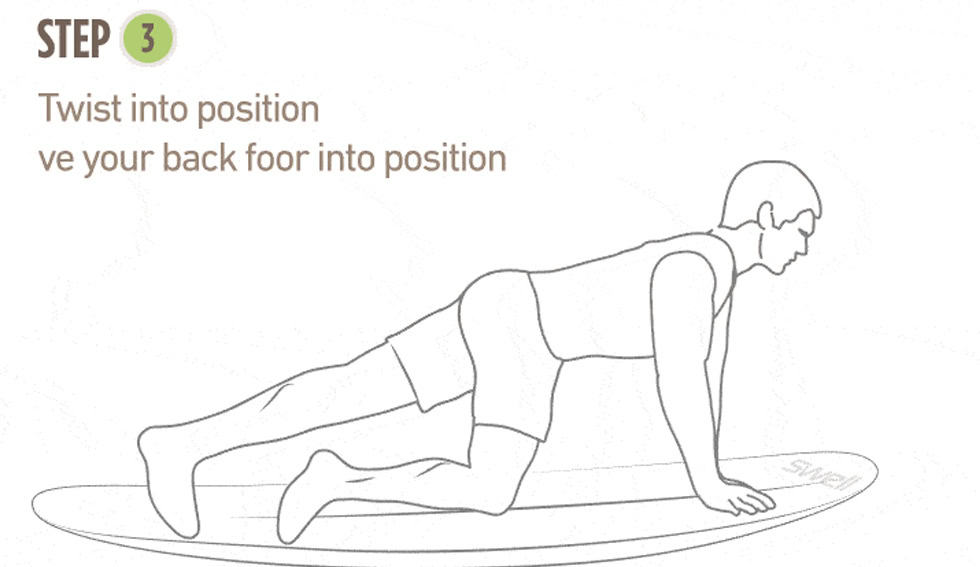
One of the majorities of mistakes that beginners, intermediate and even some experienced surfers make is the poo stance.
Just as the name indicates, when riders use the poo stance, their posture looks like that of someone sitting on the toilet seat with the knees facing different positions.
What you are doing is surfing, not using the toilet seat. Steer clear of this by any means necessary. Not only does this stance look bad, but it will also prevent the movement of your hips as you try to limit your movement on the face of the wave.

The Open Surf Stance
During the process of surfing, it is important for you to be able to handle the movement of the surfboard forward, backward, above the heels and above the toes.
Nevertheless, rather than pointing their foot sideways, lots of first-timers position their front foot to look forward. This position is known as the open stance.
An open stance allows you move forward and backward; however, it makes it impossible for you to control your movement from side to side because your front foot is looking in the direction of the nose of the surfboard.

Taking Off
For any surfer, the specific wave that he wants to ride should be used for determining his stance.
When paddling into a wave that is small, slow and mushy, the feet of the surfer may be moved forward in the direction of the nose of the board and maintained in a comparatively low stance to ensure that surfing continues.

However, in case you are riding on a medium-sized wave that is fast and hollow, you are compelled to move your feet back closer to the tail as you are taking off to ensure that obliteration is prevented.
In case you are surfing in a surf break that is affected by the wind, it may be important for you to reduce the center of gravity to take in the impacts that the rough waves produced.

Big wave surfing also requires the same rule. To maintain balance, reduce the risk of blotting out, and take in unforeseen bumps, extreme surfers have the tendency to crouch.

Low Surf Stance: an exceptional method to maintain balance.

Riding Down the Line
As soon as you start surfing, the trick lies in your ability to transfer your weight from the tail until it reaches the center. The aim is to optimize the time you spend surfing and ultimately maneuver as much as possible.

However, the surfing stance is similarly, and at the same time, an important gas pedal and brake.
Whenever there is a need for you to speed down the line to beat a crumbling section, you should ensure that your weight is shifted backward.

That is, make sure your back knee is bent.

The Essence of the Arms and Hands
When it comes to maintaining the balance as well as using the ideal surfing stance, your arms are very essential.
After you have turned up and started riding on a wave, focus on your destination and free your arms.
It will be noted that your front arm will be near the left rail of the surfboard while your right arm will be kept far back, above the right tail and near the tail of the board.

How to position feet for your turns
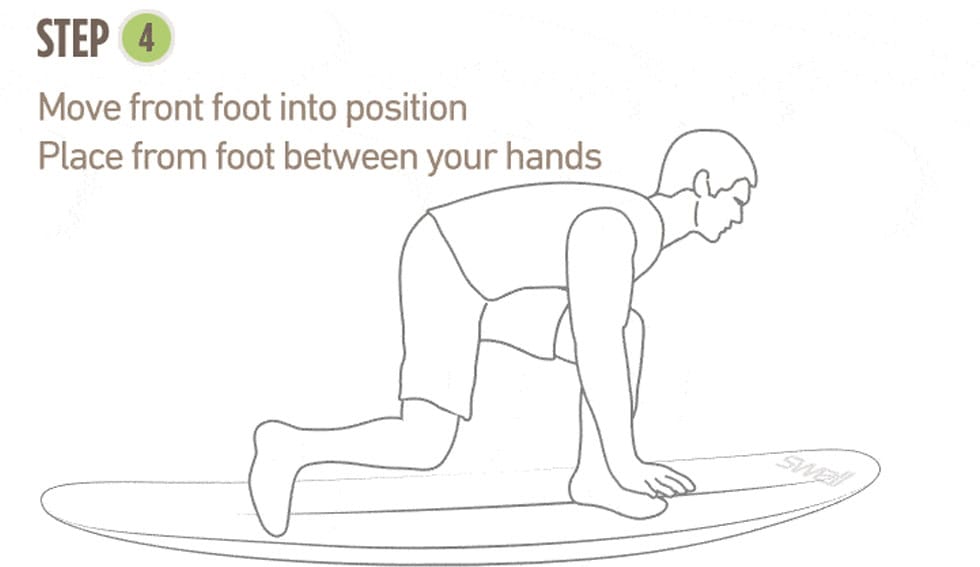
Unless there is pressure from the back foot heel and toe, the board will never make the right turn. Your back foot acts as the accelerator pedal. Although your front foot has no effect on the turning process, it offers you balance.

For you to make a proper turn, place your back foot above the top of the front fins or negligibly at the back (based on the length and type of surfboard). When a bottom turn is performed, you apply pressure to the back foot, with the main focus on the toe pressure; as a result, the rail in the tail is sunk, the fins are utilized, and the board is allowed to get to the rail and speed during the turn.

Foot placement in surfing

feet placement surf stance
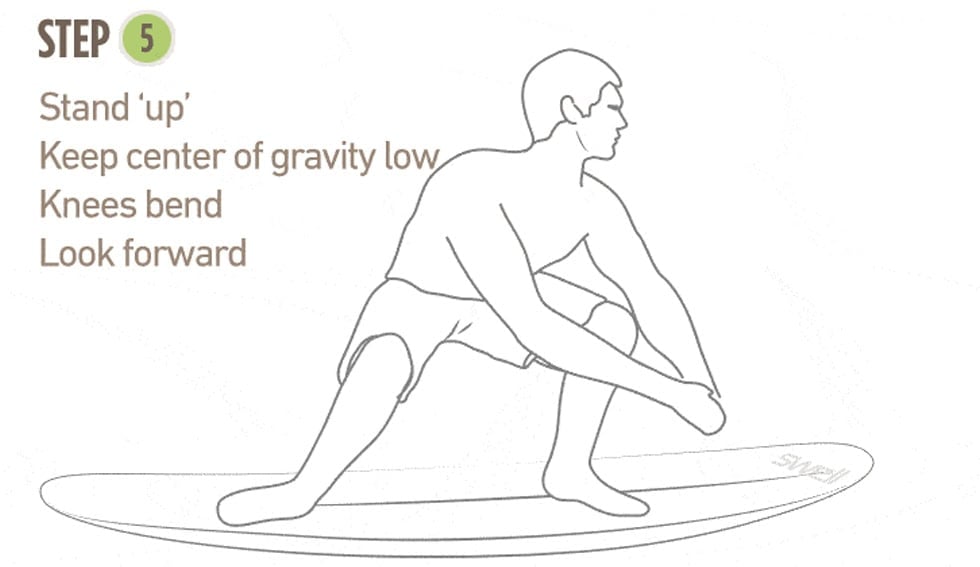
Even after application of back foot pressure, a few individuals still have difficulties with making a turn due to the fact that their foot has moved too forward. A back foot traction pad is excellent equipment because it allows you to know the specific position of your foot.

When using only wax, it will be difficult to tell where your foot is. With the aid of the traction pad, the tail of the surfboard is protected and the issues of denting from back foot pressure are relieved.

During the shift from a bottom turn to a cut-back, the back foot is pressurized once more, focusing on heel pressure, so that the rail is sunk, the fins are utilized and the board is allowed to bend during the turn.

If excess pressure is applied to the front foot during a cut-back or bottom turn, the center portion of the rail, simply forward of the front foot part, will slash into the water, ensuring that the rail is dug in and the board is slowed down. This is generally known as a rail catch.

A false impression is that a rail that is softer and rounder will not catch but an edge that is harder will catch. Without a doubt, this is a fallacy. It is only when the front foot is pressurized excessively during a turn that a rail will catch and bog.
Evidently, the turning process is largely dependent on flexibility and your body mechanics….however, to perform an excellent turn, the primary rule is back foot heel or fron foot toe pressure.

WANT TO LEARN TO SURF? OR IMPROVE YOUR SURFING

Interested in taking your surfing to the next level? Or if you have never surfed before, why not learn to surf in the warm Caribbean water on the North Coast of the Dominican Republic with Swell.

We offer stylish & comfortable surf accommodation in the cool surf town of Cabarete. Full packages with airport transfers, surf board rental pool, lessons ( or surf coaching if you already know the basics of surfing), Breakfast and 4 dinners.

Have a look at the packages we offer at Swell; the #1 Surf Resort in the Caribbean.

SEE WHAT SWELL IS ALL ABOUT


Questions or comments about this surf technique article? Let us know, send us a message.


Share on Facebook

4 TIPS FOR PERFECT WAVE SELECTION

surf wave selection

4 Tips For Perfect Wave Selection

How do you get perfect wave selection?
Is perfection even possible? Maybe.
Waves are a funny thing, every wave is different, but they can look quite similar. Predicting how a wave will break may seem like a difficult task, but don’t worry. There are a few things you can do to get yourself prepared, and we’ve got four great tips right here to improve your wave selection.

1 – KNOW YOUR SURF BREAK

In order to get perfect wave selection, you need to know your surf break in and out… or at least know what makes your spot tick.
Several factors go in to creating a surfable wave at your break.

Distant storms

It usually starts by a storm far out at sea. Powerful winds wash over the ocean, creating friction in the surface of the water. Over time, this friction builds up more and more, to create powerful swell that can travel over entire oceans. Once the waves reach shallower water, your surf break for example, they jack up in size and fold over themselves.

This is what we call breaking waves, or “surfable waves”.

Know what your break needs

To have those perfect, glassy waves of your dreams, a number of factors must come together.
At your surf break, we’re talking:

  • Wind speed
  • Wind direction
  • Tide
  • Swell direction
  • Wave periods

If the wave period is too short, with howling onshore winds, in an extreme high tide, chances are that the waves won’t be very good.
With terrible conditions, chances are most of the surfed waves will be pretty terrible too.

Perfect offshore winds

For perfect conditions, usually you’re looking for:

  • Light winds
  • Offshore winds (blowing across the beach towards the ocean, the opposite is onshore) (Light onshore if you love to pop airs)
  • The best tide for your surf break (check online)
  • Swell direction pointing directly towards your surf break
  • Longer wave periods, over 10 seconds.


Surfing in great conditions will make it way easier to select your perfect wave… … but as you already know, perfect conditions aren’t always there.

That’s why we strongly recommend you to surf in lesser-than-perfect conditions as well. If you can develop perfect wave selection in subpar conditions, chances are you will absolutely excel on those good days. Just don’t go out in hurricanes or anything too crazy.

Research your break

Research your surf break online. See what weather conditions and type of swell makes your surf break go nuts. Read up on the best tide, wind direction, swell direction and type of swell. Then go surf as much as you can on those good days.

2. Watch the waves

Playa Encuentro
Empty wave at our local surf spot in Cabarete

Watching the waves is a big one and goes hand in hand with our first tip. You first need to know about the perfect conditions for your surf break, to know when it’s go time. Then, you need to spend some time watching the waves when you get there.

It doesn’t have to be an hour long watching session… but in order to build up your perfect wave selection, you need to see how the ocean behaves before you paddle in. This could be done when doing your warm-up stretches, or when debating where to paddle out with your friend.
When watching the waves, there are a few things you should look for.

Find the peak

Surf line up
The Line up

“The peak” of a wave, means the position where the wave will start breaking first. Or, the ideal place to paddle and surf the wave.
You should always try to catch the wave right at the peak, to gain maximum speed and momentum. Shoulder hopping doesn’t do you any favors (on super crowded days we’ve all been there though…) and will limit your progress.

Look for where the line-up is and see where the other surfers are. Hopefully, most or at least a few surfers will know where the best place to sit is.

See how the waves break

In order to perfect your wave selection ability, you need to watch how the waves are breaking.

Are they mainly lefthanders? Righthanders? Is it a slower, mushier wave, or a fast, steaming, barreling freigh train? See if you can spot different sections in the wave. How many waves are in each set? Which wave is the biggest, and how far apart are the sets?

Having crystal clear knowledge about the waves you’re going to surf is critical for perfect wave selection.

If you don’t know which waves you want to surf, how could you see them in the line-up?

Other things (not necessarily related to wave selection) to look for include:

  • Entry/exit points
  • Rip currents
  • Hazards (rocks, dry reef, structures etc.)

It makes a lot of sense to know what you’re getting yourself in to before paddling out, which is why this is so important.
Watching the waves accomplishes three things:

-You develop a greater understanding of your break and the current surfing conditions
-You know which waves you want to catch…
-And which waves you don’t.

3. How to read waves

While in the water, having the ability to read waves is essential for perfect wave selection.
Imagine, you’re sitting on your board in the line-up, waiting for the next wave… you are first in line and stoked. The next set comes in. A huge, dark wall is

coming at you fast. Almost in an instant, you have to make the decision of whether to go, or to bail.

Incoming wave
Spotting an incoming wave

How do you even know if it’s a good wave? Are you in a section that will just close out or are you in perfect position?

When to paddle

There is quite a simple technique you can use to read how a wave is going to act.
First off, use the horizon as a reference. Compare the angles of the incoming wave to the vertical line. The picture beside shows what an incoming wave could look like. You could be closer to the right or left side, or you could be right in the center. What does this mean? When should you paddle?

The parts of a wave

left waves
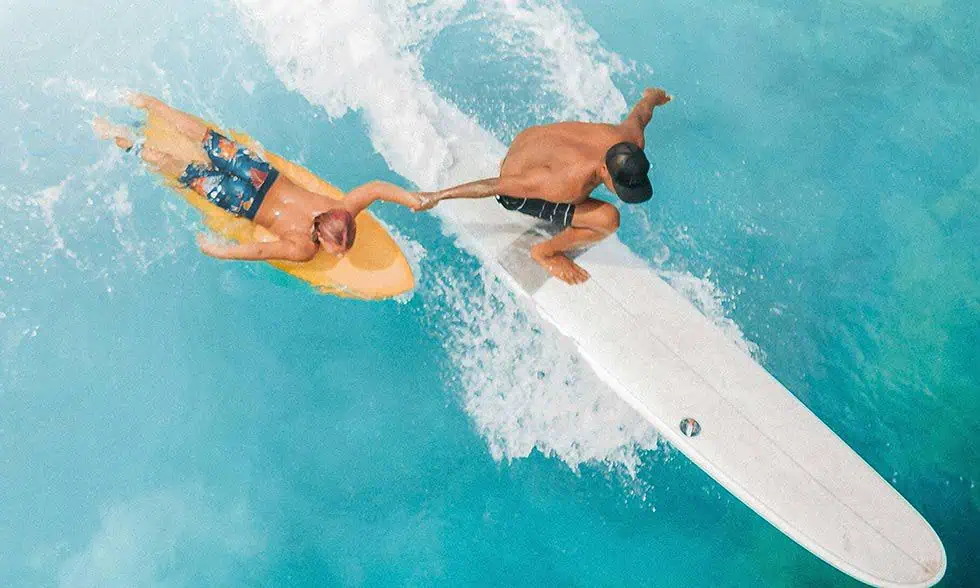
Looking at the wave coming at you, the left side is called a “right” because you go right when you surf it. The right side is called a “left” because you surf it to the left.
On the left and right side, you see the ends of the wave. This is called the shoulders of the wave. Shoulder hopping means catching the waves far out on the shoulders and should be avoided. The shoulders lack the power and speed that the peak provides.

Closeouts

Beware of closeouts (a wave “shutting down”). On an incoming wave, it’s quite easy to tell whether it’s a closeout or not. Any part of a wave that’s parallel to the horizon (vertical) will break first. Only the angled parts of a wave will break slower. In the example below, pretty much the whole middle part of the wave would break at once.

Is it a slow or fast breaking section?

The more vertical the wave is, the faster it will break. A steeper angle will break slower. In the example below, the right hander on this wave would break faster than the left hander. Why is it like this? Physics. And gravity-stuff… I don’t know.

Which direction do you surf?

If the wave looks exactly like in the picture, with both the option of going left and right, you have to make out which side you are closest too. If you are closer to the right, you catch and surf the right hander. Closer to the left? Then you surf the left hander.
What’s important is that you catch the wave in the steepest part of the wave, “the peak”. Then you ride towards the shoulder you are closest too. Or in other words, along the direction of the brea

4. Adapt your surfing

To get the most out of each wave, it’s important to adapt your surfing to the waves you surf.
You now know which conditions make your surf break great. You have watched the waves. With the surfboard around your arm, you sprint down to the beach, adrenaline rushing through your system.
Reading waves is now a piece of cake. You now know whether it’s a right or left hander and have some ideas on how to surf it. You also know where the peak is located and have decided on your focused location in the line-up.

Now what?

Adapt your surfing to the conditions you’re about to surf
If it’s a smaller day and a bit onshore, with fast sections, try working on your airs. Maybe work on your bottom turns or quick snaps. If it’s barreling but closing out, work on getting tucked in the barrel. Practice steep, fast drops. Work on getting pounded.
Make it clear in your mind before you jump in, what kind of surfing you are going to do with the waves of the day. This way you take full advantage.

You vs. Perfect wave selection
Perfect waves only exist on the most perfect of days. And the perfect days could almost always get better…
The key to selecting the perfect wave is to know which wave you want. And paddle for it.

In need of good waves?

At Swell we provide Learn how to surf holidays for people that have never surfed before as welll as a great social place to stay for advanced and expert surfers looking for a cool, comfortable & social place to stay. We offer full packages which include:

  • Airport transfers
  • Breakfast and 4 dinners
  • Comfortable & stylish accommodation
  • surfboard rentals and surf transport
  • A great social vibe


We hope to see you in the Dominican republic soon

Share on Facebook

SURF FITNESS: BEST STRENGTH EXERCISES

surf fitness exercises

The Best Strength Exercises to Improve Your Surfing

Last week we focussed on cross training exercises to get your surf fitness up. Today we focus on the best strength exercises for surf fitness

Surfing is not like most sports: there’s no running clock, there’s no designated playing area, and there is certainly no prescribed training regime that works for all athletes. Many would argue that surfing is not a sport, but rather a lifestyle.

Hanging out at the beach  and catching waves certainly doesn’t feel like a sport. Regardless of one’s views on where surfing fits into the sporting world, no one can deny that surfing is physically demanding. Simply paddling out on a decent-sized day requires a well-tested cardiovascular engine and a fit upper body. Catching a wave and popping up entails heightened agility and ample flexibility.

While the act of actually riding a wave and carving demands intense core strength and sturdy legs. Not all surfers are the type to hit the gym and pump serious iron, and that’s ok. Bulky muscle is not conducive to paddling, anyways. To achieve an optimal level of surf fitness, one needs the perfect blend of strength and muscle endurance. Dive in below, to check out Swell’s:

BEST SURF FITNESS EXERCISES

1. Pushups

surf-fitness-exercises
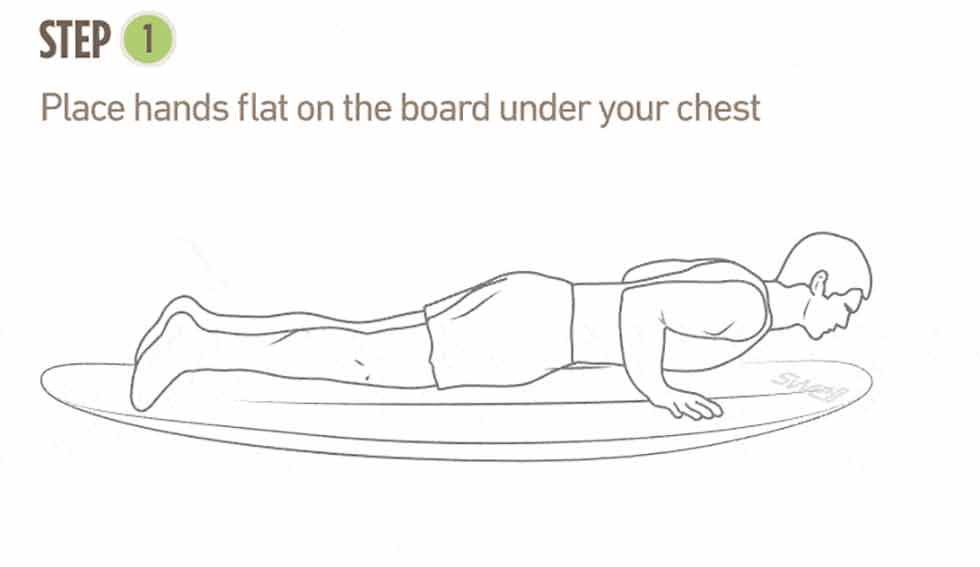
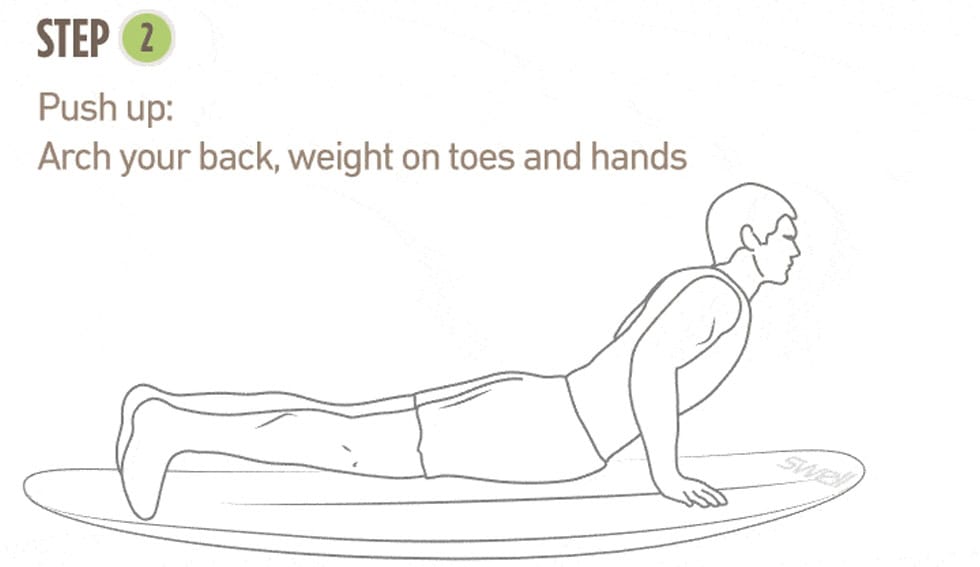
This may seem obvious, but the simple push-up is a highly effective, yet often overlooked, tool for building upper body strength and endurance. The good thing about the push-up, as with any bodyweight exercise, you won’t build bulky, excess mass.

Instead, you will build functional upper body strength that is proportionate to your body weight. Work to perform a high number of reps at a high intensity. Set a lofty goal, like 100, 200, or 300 push-ups, and see how long it takes you to get there. Like paddling, the pushup, or press up as it is often referred to across the pond, requires a blend of strength and muscle endurance.

2. Pull-ups

Surf strenghtLike the pushup, the pull-up is another phenomenal bodyweight exercise that will build functional strength relative to one’s body weight, not bulky, unnecessary mass, so an ideal surf fitness exercise. Similarly to how we described the pushup, with the pullup we want to build our rep capacity.

Start with a reasonable number like 10, 20, 30, 40, or 50 and attempt to execute that many reps in as few sets as possible. As you get stronger, set your rep goals higher. Unlike the pushup, the pull-up does, somewhat, mimic paddle movement and work the large muscles in the back (the lats) that are activated during paddling.

3. Inverted Rows

surf strenght exercisesOften used as a scaled-down pull-up substitute, inverted rows are a great way to strengthen your lats, the small muscles in your upper back, and your rear deltoids (all paddle muscles). As stated previously, if you cannot do a pull-up, inverted rows are a great place to start. To perform lay horizontally below a suspension trainer or secured barbell. The higher off the ground the suspension trainer/barbell, the easier the exercise will be.

With your heels planted on the ground, grip the bar slightly wider than shoulder-width apart, or hold your suspension trainer in a neutral position slightly wider than shoulder width. Pull your chest towards the bar/ suspension trainer. As you pull, keep your core tight and hips up, in line with the rest of your body. As your chest moves higher, pinch your shoulder blades together to activate the smaller muscles in your back. Perform three sets of ten.

4. Handstand Push Up

hand stand exerciseHandstand push-ups might sound intimidating, but they are not as difficult as they may look and they have a myriad of benefits that will directly improve your surfing. Handstand pushups target your deltoids, which are used heavily when we paddle. What makes Handstand pushups superior to any old overhead press, for surf training specifically, is that like the aforementioned push-up and pull up, handstand pushups build lean muscle and functional strength relative to one’s body weight.

To perform, place a pad about 12 inches from the wall.
Place your hands slightly wider than shoulder width on the sides of the pad and kick your feet up so that you are in a full handstand position with your heels supported by the wall. Lower your head slowly down until it is resting on the pad and then push up to the starting position. Perform 3 sets of 5-10 reps.
Here is a good article on how to get started with handstand push ups (opens a new window)

5. Pike Push Up

For those not quite ready to kick up onto a wall and crank out handstand pushups, the pike push-up is the ideal substitute.

Like the handstand push-up, the pike push-up targets our shoulder muscles (deltoids), which are crucial in paddling. To perform a pike push-up, place your feet on a bench or box, with your hands on the ground, wider than shoulder width, shape your body like an inverted L. With your torso vertical, and your legs horizontal, lower your head down to the floor between your hands, and press back up.

6. Suspension Trainer Rear Delt Fly

The small muscles in our back our crucial for paddle endurance, but they are often overlooked in training. Fortunately, it doesn’t take much to keep your rhomboids and surrounding muscles fit. You don’t need to use a lot of weight, in fact, you only need to use a fraction of your body weight. Suspension trainer rear delt flies are a great way to train these muscles and you can do it virtually anywhere.

To perform, grab the suspension trainer handles and hold them together vertically, at arm’s length away from your chest. Walk forward a few steps and lean back so that your body is hanging at a slight incline, supported by the suspension trainer. Firmly gripping each handle, with your elbows slightly bent, pull the handles apart, while simultaneously pinching your shoulder blades together. Perform 3 sets of ten, focusing on control and maintaining a slow movement throughout the set.

7. Burpee Box Jumps

If you’re looking for an intense way to train explosiveness, like that required in a pop-up during a steep drop, look no further than the burpee box jump. Yes, it is as brutal as it sounds, but the combination of these two already explosive exercises create the perfect pop-up trainer. The burpee portion mimics the pop-up movement, training muscle memory, while the box jump adds lower-body strength training and explosiveness to the equation.

To perform, stand in front of a box slightly further than an arm’s length away. Drop to the ground, chest to the floor with your arms tucked at your side like you are about to perform a push-up. Then, explode off the floor back into a standing position and in one movement, execute the box jump.

8. Bosu Ball Stability Squats

This exercise is a tad more advanced than some of the others, but if executed properly and regularly, it will enhance your surfing ability. The Bosu Ball is a unique piece of fitness equipment that allows you to train strength and balance simultaneously.

If you can already properly execute a squat while balancing on a Bosu Ball, consider adding weight. If you’ve already added weight, try adding uneven loads, like one kettlebell overhead, and alternate sides. To perform, place the Bosu Ball ball side down and stand on the platform with your feet shoulder distance apart. Slowly and carefully, lower yourself down into a squat position. Make sure your knees never go past your heels. Add weight if necessary.

9. Rowing

The erg machine might be the best piece of equipment in the gym for total body surf training. Rowing recruits massive amounts of lower body strength, arm and back strength, muscle endurance, and heavy aerobic activity. Whether you’re training to paddle hard, toss buckets on turns, or to last hours in the lineup rowing is the exercise for you. To start, try rowing 1000 meters for time.

The most important part of training and getting in shape, is finding something that works well for you and that will keep you motivated. If you can surf every day, do it. There is no better surf training than surfing itself. If you can’t surf every day, hit the gym, the pool, the yoga studio, or the trail.

Enhancing Flexibility with Yoga

Best Yoga Poses for Surfers

Yoga and surfing go together like peanut butter and jelly. Yoga helps you become more flexible and balanced, which is super important for surfing. Some great yoga poses for surfers include:

  • Downward Dog
  • Warrior II
  • Pigeon Pose
  • Cobra Pose
  • Child’s Pose

These poses help stretch and strengthen your muscles, making it easier to move on your board.

surf yoga

How Yoga Prevents Injuries

Doing yoga regularly can help you avoid getting hurt while surfing. Yoga improves your posture and makes your joints healthier. This means you’re less likely to pull a muscle or strain something. Plus, yoga helps you stay relaxed and focused, which is key when you’re out on the waves.

Incorporating Yoga into Your Routine

Adding yoga to your daily routine is easier than you think. Start with just 10 minutes a day. You can do it in the morning to wake up your body or in the evening to wind down. Try to mix it up with different poses to keep things interesting. And remember, the more you practice, the better you’ll get at surfing!


Improving Balance with Bosu Ball Exercises

Top Bosu Ball Moves

The Bosu Ball is a fantastic tool for improving your balance and strength at the same time. Here are some top moves to try:

  • Bosu Ball Squats: Stand on the flat side of the Bosu Ball and perform squats. This will challenge your stability and leg strength.
  • Single-Leg Balance: Stand on one leg on the Bosu Ball and try to hold your balance. Switch legs after a set time.
  • Push-Ups: Place your hands on the Bosu Ball and do push-ups. This adds an extra balance challenge to a classic exercise.

Benefits for Surfing

Using a Bosu Ball can greatly improve your surfing skills. Better balance means better control on your board. Plus, the strength you build will help you paddle stronger and pop up faster.

Safety Tips

When using a Bosu Ball, safety is key. Here are some tips to keep in mind:

  1. Start slow: Begin with basic exercises and gradually move to more advanced ones.
  2. Use a spotter: If you’re trying a new move, have someone nearby to help if needed.
  3. Keep your core engaged: This helps maintain balance and prevents falls.
  4. Check your form: Make sure you’re doing the exercises correctly to avoid injury.

Cardio Boost: Jump Rope Drills

Why Jump Rope is Great for Surfers

Jump rope is an awesome way to boost your cardio and get your heart pumping. It’s a full-body workout that helps improve your coordination, balance, and endurance. Plus, it’s super fun and can be done almost anywhere!

Fun Jump Rope Routines

Mixing up your jump rope routines can keep things exciting. Here are a few to try:

  • Basic Jump: Just your standard jump, but try to keep a steady rhythm.
  • High Knees: Bring your knees up to your chest with each jump.
  • Double Unders: Swing the rope under your feet twice for every jump.
  • Criss-Cross: Cross your arms in front of you while jumping.

Jump Rope Safety Tips

To avoid injuries, keep these tips in mind:

  1. Warm-Up: Always start with a warm-up to get your muscles ready.
  2. Proper Footwear: Wear supportive shoes to protect your feet and ankles.
  3. Smooth Surface: Jump on a flat, non-slip surface to prevent falls.
  4. Stay Hydrated: Drink plenty of water before, during, and after your workout.

Longboard


Conclusion

Surfing is more than just a sport; it’s a way of life that demands a unique blend of strength, flexibility, and endurance. By incorporating these strength exercises into your routine, you’ll not only improve your surfing skills but also reduce the risk of injury. Remember, the key is consistency and having fun with your workouts. So, grab your board, hit the gym, and get ready to ride those waves with more power and confidence. Happy surfing!

Frequently Asked Questions

Why are push-ups important for surfers?

Push-ups help build upper body strength, which is essential for paddling and popping up on your board.

How do planks improve my surfing skills?

Planks strengthen your core, which helps with balance and stability while surfing.

What benefits do squats offer to surfers?

Squats build leg strength, which is crucial for maintaining balance and control on your surfboard.

Why should surfers include rows in their workouts?

Rows strengthen your back muscles, which are important for paddling and overall posture.

Are burpees good for surfing endurance?

Yes, burpees are great for building both cardio and strength, helping you last longer in the water.

How can lunges help my surfing performance?

Lunges improve lower body strength and stability, which are key for powerful and controlled movements on your board.

What yoga poses are best for surfers?

Poses like Downward Dog, Warrior, and Pigeon help improve flexibility and prevent injuries.

Why is balance training important for surfers?

Balance exercises, like those on a Bosu ball, help you stay steady on your board and react quickly to waves.

This article: Surf fitness exercises is part of our Swell instructional how to surf blog posts. Other popular episodes are:

About us

Have a look and see what a surf holiday with Swell is all about. We offer learn how to surf holidays for adults looking for an active & social water sport holiday. But we also offer a stylish and comfortable place to stay for people who already know how to surf.

Share on Facebook

SURFING: HOW TO GENERATE SPEED ON A WAVE

Surfing: How to generate speed

SURF TECHNIQUE: HOW TO GENERATE SPEED ON A WAVE

Have you mastered a proper pop-up? Can you read oncoming waves? Can you select, paddle, and catch a wave on your own accord? Can you turn down the line and ride an open-faced, green wave? If so, congratulations. You are ready to learn how to generate speed and set up maneuvers. Generating speed on a wave ensures the longest possible ride, and allows the surfer to set up further maneuvers, such as cutbacks.

There are two ways to generate speed on a wave: trimming and carving. Whether you use trimming or carving depends on a variety of variables like board size, wave type, maneuver goals, and wave size. To find out how to properly generate speed on a wave, and whether you should be trimming or carving, keep reading! At Swell , we are here to help improve your surfing for your next surf trip to our Caribbean surf resort, or just for your surfs at your local break back home!

TRIMMING

What is Trimming?

SURF GENERATE SPEED
trimming

Trimming is a technique employed when a surfer needs to maintain speed and navigate the face of a wave to stay in an optimal position to continue surfing at a high speed or to set up a maneuver.

Unlike carving, trimming does not involve large, rounded turns but rather, trimming requires delicate rail work. The rail is the side of a surfboard, and it is the part of the board that is most engaged in the wave face during trimming. When a surfer trims, he or she makes small adjustments in his or her weight distribution and stance to set the rail into the wave’s face and then to release it. This act moves a surfer quickly down the line, keeping her or him ahead of the breaking water.

Wave Type

While there are a number of factors that go into whether you trim or carve on a wave, the wave itself sometimes won’t give you a choice. A fast-breaking wave makes it virtually impossible to perform regular, elongated carves. Therefore, on a fast-breaking wave, you have no choice but to trim.

Board Type

It is possible to trim on all board types. In fact, trimming is useful in a variety of situations on shortboards and longboards. But if you are a longboarder, you will find that you will be trimming on most waves, even if short boarders are carving.
The large surface area and volume that long boards have makes generating speed as simple as walking up the board. To trim properly on a longboard, a surfer should move towards the center of their board and set their rail into the wave and then release it as needed. Longboarders use trimming to set their board, to walk to the nose, or to set up a cutback. Short boarders use trimming to gain speed for an air/ cutback off of a high line, to navigate a barrel, or to stylishly cruise on a high line.

Weight Distribution and Turning

Whether you are on a longboard or a shortboard, trimming takes a specific stance, weight distribution, and technique. To effectively trim, a surfer should be positioned more towards the center of the board, have a stance slightly wider than shoulder width, and have their feet placed somewhat closer to the rail that is engaged in the wave’s face. As you move down the face of the wave, lean in and put your weight towards the wave to move up the face, engaging your rail into the wave.

Additionally, your weight should be distributed more to the front foot than the back. This is referred to as putting on the gas. Once you’re high enough on the wave, faintly let your rail out and allow your board to move down the wave before reengaging and moving back up.

Possible Maneuvers to Set Up

If you’re trimming properly, there are a few maneuvers that you will be able to work on. From a proper trim or high line, you can execute a cutback, set up an air, or if you’re on a longboard, walk the noise. You can also execute floaters on a closeout section.

CARVING

What is Carving?

surf generate speed carve
Carving bottom turn

Carving is a way of moving down the face of the wave and generating speed while doing so. Carving involves larger, deeper, and more radical turns than trimming.

A surfer carving will make a series of bottom turns and top turns down the waves face until the end of the wave, the whole time utilizing their fins to make sharp, dramatic turns on the wave’s face.

Wave Type

While it may be possible to do a few top or bottom turns on a fast-breaking wave, the ideal wave for carving is a slow breaking, somewhat steep-faced, wave. A slow breaking wave allows for a surfer to do a drawn-out bottom turn to drop in, without risking getting caught by the whitewater, and then set up a succeeding top turn. This act is repeated over and over down the wave’s face.

Board Type

To properly execute swooping bottom turns and sharp top turns that are required in proper carving, a shorter board is required. While it is definitely possible to carve on a longboard, it is difficult given the board’s length and the distance of the rider’s feet from the fins and certain points in the wave. A shorter board (anything below 7 feet) will allow you to maneuver more freely and whip the board around for sharper, more dramatic turns.

Weight Distribution and Turning

Like trimming, carving takes a particular stance, technique, and weight distribution to be done successfully. To effectively turn sharply, whether a top turn or a bottom turn, a surfer must “pump the brakes.” Meaning the surfer must put their weight on their back foot to engage their fins in the wave and allow the board to turn sharply. When you are ready to perform a carve, put weight on your back foot and slightly towards the rail that is engaged in the face of the wave.

Then as you turn, shift your weight forwards and towards the direction of your turn. For example, when you engage with your toeside rail in the face of the wave and you want to perform a cutback, then lean into the wave’s face and then engage the fins, rotate your board, and shift your weight to the other rail. When a surfer places weight on their back foot, the nose of the board lifts out of the water just enough to allow the surfer to pivot the board using a combination of the engaged fins and rail.

Possible Maneuvers to Set Up

High-performance surfing essentially is carving. With the exception of airs, most traditional high performance and power surfing maneuvers involve large cutbacks, swooping turns, and powerful hacks into the waves face. If a surfer wants to improve their performance surfing, the first thing he or she should do is learn how to properly carve.

Armed with the knowledge on how to properly trim and carve, you are ready to get out in the water and work on generating speed on a wave. Once you’ve successfully mastered generating speed, move on to learn how to set up maneuvers and learn to look for workable sections in a waves face. To further your progression, come visit us in the Dominican Republic at Swell to surf the warm, welcoming waters of the Caribbean Sea!

We hope you like this article “Surfing: How to generate speed” But if you have any questions about this topic, feel free to send us an email about this topic (or any surf related topic) I am sure we can help you progress with your surf abilities.

Video: Surfing how to generate speed


YouTube video

Similar topics on the Surfing: How to generate speed are the following:

More info on external websites:
How to make your turns faster (opens new window)

Share on Facebook

7 CROSS TRAINING TIPS FOR PEAK SURFING PERFORMANCE

surf fitness

7 Cross Training Tips for Peak Surfing Performance

IMPROVE YOUR SURF FITNESS

We all want to be able to ride the waves like a true champion. When you first begin surfing, no matter the age, you are both excited and motivated to take on this new challenge. As many will attest though, despite any amount of youthful confidence in your earliest lessons, many are shocked to discover that the challenge of being the next pro surfing great, is indeed greater than they anticipated.

Not to be discouraged though, many new and experienced boarders will simply bounce back up and give it another go. There are several exercises and tips you can incorporate though if you really want to maximize your ability and potential on the board. Here are 7 of the best to improve your surf fitness:

SKIING

skiing surf fitnessMany may recommend snowboarding here, and whilst practicing another board sport is an excellent way to prepare for the open water, skiing just adds that extra dynamic of having your feet move more freely. This is something which absolutely helps to improve your focus, and given the unpredictability of the waves on occasion, we feel like I is a similar match for that of the mountain and the obstacles which it presents.

Working on your skiing will help you focus on a variety of areas which are considered essential in surfing too. These include knowing where your feet are positioned and how to direct them at all times. Besides this great footwork training, you will also get accustomed to dealing with the reality of falling down but getting right back up again. This is something which is likely no more perfect to prepare you for the life beyond the TV glamour of learning to surf, which undoubtedly will involve many horizontal moments.

SWIMMING

swimm surf fitnessIt seems like an obvious selection, but as a reminder to some who may have overlooked it, swimming is the most important skill which any surfer must possess. It is after all a water sport, and you will indeed find yourself in the ocean on more occasions than you may expect. This is key through all stages of your surfing development. As you start to become more accomplished, sure you become a better surfer, being a top quality swimmer suddenly becomes all the more important.

The added advantage with bringing top notch swimming skills to the water add is that you will have the confidence in swimming so that you do not fear falling from the board. This can be a key tool in helping you overcome challenges when learning. As any surfer will tell you, the water often feels like their second home, this is particularly useful at times when you feel challenged by boarding techniques.

SKATEBOARDING

skateboard fitness
Another board sport which many surfers gravitate toward and vice versa. Skateboarding is ideal from both a theoretical and practical viewpoint when you are learning to surf. It helps you identify the best boards that suit your style. FinBin is an awesome resource for choosing your surfboard, but skating really gets you in the groove in terms of identifying what you need and prefer.
As a more experienced surfer, it is not always possible to get on the water, that could be due to poor conditions or a variety of other reasons. Skateboarding is perfect for keeping your skills honed and on point when you can’t make it to the surf. Achieving your potential really requires constant practice and keeping those skills sharp at all times. This is one of the primary reasons you will find many of the world’s top surfers at your nearest skate park on the off-season.

DANCING

dance to surf fitnessThis next training technique is a bit of a curve ball for many. Dancing can have a number of benefits to see you reach peak performance on the board. How is that possible? – Movement. This movement and most importantly coordination with your partner in dancing, can easily transfer across onto the board. Knowing where your feet are positioned at all times is vital when boarding and dancing.

Timing, movement and coordination are all vital parts of both activities, therefore it actually makes perfect sense that the best surfers in the world should spend some time on the dancefloor perfecting their moves. That said, if you have two left feet on the dancefloor, don’t worry too much. There are many other methods you can use to reach peak performance in surfing as we have outlined.

CORE STRENGTH

surf fitnessThis is a broader concept, but staying upright on a surfboard requires a lot of core strength. Not only that, but getting back up on to your board and keeping your balance are all centered on the core of the body. Therefore, anything you can do to boost your core strength will result in positive results in the swell.
Luckily for us, many of the exercises mentioned here are also fundamentally based around improving your core strength, so in many cases these activities come with multiple benefits to help you get the best out of your surfing potential.

CROSSFIT

cross to surf fitWhat better way to boost that core strength we just mentioned than engaging in one of the trending exercises of the moment. CrossFit training will absolutely help boost your core strength and that of the rest of your muscle groups whilst also promoting and improving agility. There is so much crossover here which can help you with your surfing performance that most top guides nowadays would actively encourage registering yourself with a CrossFit program.
Naturally, this strength and agility will help you on the board, but it should also serve to boost your self confidence in that beach body too! This is something which cannot be underestimated when boarding and getting the most out of your performance. Having the ability and confidence to test yourself and not be afraid of failure is absolutely vital.

CALISTHENICS

calisthenics for surfWhen we talk about movement, agility, and flexibility, we absolutely must give a mention to calisthenics. This makes us focus on all of those areas and boosts a number of the areas which we have already discussed. This attention to bodily movements and the amazing boost which some of the workouts will give you raw core strength is vital if you want to take to the waves and be the best that you can be.
A final key area where calisthenics proves invaluable to surfers is focus. Focus and clarity of the mind may be one of the single most important attributes a surfer possesses. Having the ability to focus on themselves and the challenges they face, without distraction. This is something relevant to any professional sport and particularly surfing. That is a primary reason why you will see many top surfers and athletes in general now engaging in more and more calisthenics training.

CONCLUSION

Of course, much of a really elite level surfer’s skill comes from a profound level of natural ability. Desire and motivation to reach those challenging goals are also vital. Having the right type of equipment too. What we have outlined though is that through training, in any area, there are multiple ways in which you can improve your own performance and skill level.

Working hard and training hard is a vital element in any sport or profession, surfing is no different. With multiple options to choose from, there is no excuse not to engage and derive some benefit from any of the activities mentioned which can ultimately translate to you improving your surfing skills regardless of your level.

Share on Facebook

SURF TECHNIQUE: SURF EQUIPMENT

swell

SURF TECHNIQUE: SURF EQUIPMENT

In this episode of “Surf Technique” we explain surf equipment (surfboard and the surf accessories) for people who have never surfed before, and are not familiar with the surf jargon.


surf equipment

Surf Equipment


Elements of the surfboards:


surfboard nose shape1. Nose

This is the front part of the surfboard.

There are a couple of different variations, from pointy (generally a shortboard) to a very round nose, which are found on fish shortboards, mini-mals and longboards.

As a general rule of thumb, a more Pointy Nose means more manoeuvrable but less paddle flotation, versus the Round Nose, which is less manoeuvrable, but provides better flotation and wave catching ability.


2. surfboard rockerRocker

You will see the rocker of a surfboard when you hold the board sideways; it’s the curve of the board from front to back. More curve on the Rocker means a slower board, but this gives more manoeuvrability. A straighter rocker means more speed but, you’ve guessed it, less manoeuvrability.


3. surfboard concavesConcaves

The concave is the shape of the bottom of the board from side to side.

There are numerous variations: Some boards are completely flat (no concave), others have a bit of a ‘belly’ and others are shaped as if you were holding in your belly (a curve inwards).


Many have a double concave. Concaves control the water flow and amount of air which moves under your surfboard when riding, so it follows that the different concaves will cause the surfboard to act slightly differently.

Your surfboard shaper or local surfboard shop will explain more to you.

4. Leash.

This is the stretchy plastic cord that keeps your board from running away, using a Velcro strap. The surfboard leash gets attached to your leg which is on the back of the surfboard: Goofy footers (= right foot in front) put their leash on their left foot.

Natural or regular footed surfers put their leash on the right ankle.

5. Leash plug.

This is found on the back part. It’s used to attach the leash to the board and is an integral part of the surfboard (unlike the leash, which is detachable).

6. Fins.

These are the ‘rudders’ which allow you to steer and remain stable (providing the ‘grip’ on the wave). They are either fixed or removable. There are various different fin options available in surfboards.

You can have a large single fin, 2 medium size side fins, the thruster (the most popular) has 3 fins and some boards are quad (4) fins.

The performance of the board is heavily influenced by your fin set up. Again, your surfboard shaper or local surfboard shop will explain more to you.


7. surfboard tail shapesTail.

This is the back part. This is where you place your back foot. For extra grip, most shortboards have a deck pad made of grippy rubber on the tail.

8. Rail. (the ‘edge’ of the board if you like). Pay attention and you’ll see that rails can vary over the length of the board (in the middle of the board they will be fatter, tailing off towards the nose and tail).

Rounded rails help your board stick to the wave better, sharp ones cut into the wave and give you more speed, also giving you better manoeuvrability.

9. Bottom.

This is the bottom part of the board (with the aforementioned concaves).

10. Outline.

This is the general shape of the board. Over the last 4 decades surfers and surfboard shapers have come up with 1000’s of different designs with varying degrees of success. See some of the most common shapes and designs on this webpage: Choosing the right surfboard.

Volume: In the last decade, more and more manufacturers are placing the volume (in litres) on the board as a way to tell the customer on the amount of ‘flotation’ the board will give. The following websites provide handy volume calculators for their boards.

BoardFormula (opens in a new window)

The surfboard calculators will give you a good reference on whether a surfboard is suitable for you or not. Taking your weight, fitness and surf level into consideration as well as the type of waves you are expecting to be surfing with the board. As a general rule, the better a surfer you are, the less volume you want in your board.

Surf wear (not the pseudo-fashionable kind you find in stores like Hollister, but the functional kind that you need for actual surfing.

Not everyone is blessed with year round warm water conditions as we are in the Caribbean (all we need is board shorts, a bikini and a Lycra) so here’s a list of what you might need.

Wetsuits:

wetsuit
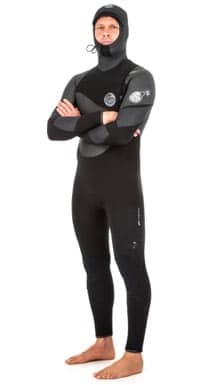
Come in various thicknesses, usually indicated by numbers separated by a forward slash, a 5/4 for example, where the first number indicates the thickness (in mm.) of rubber on your core (torso) and the second number indicates the thickness of the neoprene rubber on your arms and legs. Thicker wetsuits means less flexibility, but thinner wetsuits are not as warm.

Very cold water wetsuits are generally in the 5/4 range.

Medium wetsuits are 4/3

Spring wetsuits are in the 3/2 range.

Summer wetsuits either have short arms, or short legs or both and are referred to as a shorty. These are usually a 2/1.

An alternatives to a summer wetsuit is a neoprene top with long sleeves or short arms. For women, many surf brands now produce great all in one bathing suits for women made out of neoprene, which not only look great but are also super-functional in the water.

If the water is warm enough you’ll want to ditch wearing any kind of neoprene wetsuits and just surf in a Lycra. A Lycra (sometimes called a rash-guard) serves 2 purposes: It provides a 30 to 50 SPF sun protection and also serves to prevent a skin rash from rubbing your bare skin on the surfboard. Surfboard wax and sand can easily give you a rash.

Board Shorts

Not only for guys, girls often wear a pair of long board shorts to protect their legs from getting a rash and even worse, losing a flimsy bikini in the waves.

Surf boots:

Surf booties serve 1 or 2 purposes:

They keep your feet warm when surfing in very cold water, and/or they protect you when you hit the coral or any other sharp reef.

Other surfboard accessories which might be useful when you are buying your first surfboard:

Board bag:

A surf boardbag protects your board when you load it on top of your car, when storing at home, or during air travel. It also provides good sun protection so your surf wax doesn’t melt off, as well as preventing your lovely white surfboard from turning yellow after prolonged exposure to UV sun light.

Thin knitted board bags (called socks) provide little protection from damage, but are good for day to day use to and from the beach.

Surfboard wax:

Goes on top(!!) of the surfboard, where you will place your feet, not on the bottom, as with skis and snowboards. Tip: Don’t leave wax in your car on the dashboard in the hot sun, it will melt and will take you hours to clean up (yes, we’ve done that). Don’t leave your surfboard in the sun at any time, but especially when it is waxed, as the wax melts quickly on your board too.

Fin key:

A small Allen key you use to lock in surfboard fins which use an FCS or Future Fin system.

Other useful accessories:

Most surfing destinations around the world are heavily affected by the tides, so check online or ask for a tidal chart at your local surf shop. Global Tide is a great phone app which gives very accurate local tides and times when location detection is on.

These days all surfing equipment and accessories can be bought online, however supporting your local surf shop is a much better choice, especially when you are new to the sport of surfing. The (local) knowledge these folks can give you is worth much more than the $20 dollar discount you might get when you buy online. The same goes for a local shaper, they can see you surf or listen to your surf experience and where you struggle.

Honestly and correctly assessing your level of surfing is absolutely crucial in buying the right surfboard, or having one shaped that really suits your ability. Surfing with a board which is not right for you will either stop your progression, or at least stall it. A classic example of that would be buying a board which is too small because, well, they look cool and those pro’s sure make them look like an easy ride. They are not; quite the opposite in fact.

Swell Surfboards

THEORY SURF LESSONS AT SWELL

The above is a small part of the theory surf lessons we give at Swell as part of the learn how to surf courses we give here in the Caribbean. If you are interested in joining us in the Caribbean this winter (or any other time of the year) send us a message.


YouTube video


Share on Facebook

STAFF: MEET RICCI AND ALEXANDRA

At Swell we want to make sure our clients get the best surf experience possible, and the best way to guarantee this is by having top staff work for us. Last year Ricci was at Swell for 3 months, and he left a great impression on the clients and the rest of our staff. Because Ricci had commitements in Europe as a Snowboard instructor & guide in the Alps he had to leave us for a season in the snow.

Ricci Swell Surf Instructor

Ricci was keen to come back to Swell, and we are very keen to have him back. for the full 2018 / 2019 winter season.

Alexandra (Alex) is Ricci’s partner and she is the new surf photographer at Swell taking photos of our clients who are interested in the photo packages she offers. And additional bonus is that Alexandra also takes video footage of the clients during their lessons, so after the lessons are done the footage can be played back to analyze where improvements can be made in the surf technique of the clients.

Alexandra has years of experience as an action and lifestyle photographer, and so far the lifestyle and surf photos she has produced are of great quality.

Here are some sample photos of here first few days in Cabarete

Surfing Encuentro
Morning at Playa Encuentro
Encuentro surf lessons
Swell Surfboards
Swell Surfboards
Groups Shots
Groups Shots
Playa Encuentro
Playa Encuentro
Swell visitor
Swell visitor
Playa Encuentro golden morning light

As you can see Alexandra is a great photographer, so if you want to have your surf photos taken and a surf video analysis during your stay at Swell, sign up for the photo package and go home with your memories in HD photo format.

OTHER SWELL NEWS

Normally when one surf instructor arrives another instructor leaves, this winter we have deceided to change this, since it’s looking like it’s going to be a very busy winter season for us here in the Caribbean. As a result Lee, our lovely English surf instructor has decided to stay on for the rest of our high season.
So our team for the winter season 2019 is:

    1. Lee (english) – Surf Instructor
    1. Ricci (Italian) – Surf Instructor
    1. Neno (Dominican) – Surf Instructor
    1. Jeffrey (Dominican) – Surf Instructor
    1. Alexandra (French) – Surf photographer

So if you are interested in learning to surf, then have a look at the learn to surf courses we offer at Swell and contact us today to secure your surf holiday.

CARIBBEAN SURF HOLIDAY EXPIRIENCE


About Swell: We provide active holidays for adults in the Caribbean. Ideal for solo travelers and couples who are looking for a fun and social vacation.
See our video below.


YouTube video

We hope to see you soon in the Caribbean
Clare & Jeroen Mutsaars

Share on Facebook

SURF TECHNIQUE: HOW TO DUCK DIVE

how to duck dive

SURF TECHNIQUE: HOW TO DUCK DIVE

& HOW TO TURTLE ROLL

Swell Surf technique series:
If you have ever tried to surf without knowing how to turtle roll or duck dive, you might not have had a great time. Both turtle rolling and duck diving are an essential part of surfing. Without doing either, we would spend our entire surf session washing back to shore every time a set came through.

If you’re unsure whether you should turtle roll or duck dive your board, this article is for you.

If you’re unable to safely and effectively paddle out to the lineup on your own, this article is for you. And lastly, if you can duck dive or turtle roll, but not with 100% effectiveness, this article is for you.

Here at Swell Surf Camp, we want to give you the tools not just to surf when you are on your learn to surf holiday with us, but to surf anywhere in the world.

SURF TECHNIQUE: HOW TO DO THE TURTLE ROLL

1. Which type of board are you riding?

Do you want to know if you should turtle roll or duck dive? Look at what you’re riding. If you’re on a longboard, or even a fun size, and you cannot easily push the entire board under water, then you should be turtle rolling.

2. Don’t rush it timing is everything

When you arrive at the beach, don’t immediately run into the ocean to paddle out. First, warm up, relax, and watch what the waves are doing. As you watch the water, you should look for any channels that may exist help your paddle out. Time your paddle out for a lull between sets.

3. Walk your board out

To enter the water, walk your board out with it tucked safely under your arm to chest deep water. We do this to ensure that our board stays safely at our side and does not get washed into any other surfers. Additionally, if you lie on your board to paddle in too shallow of water, you risk breaking the fins off of the board.

4. Spot the wave ahead and get ready to roll

As you paddle out, you should be constantly looking out to sea for oncoming waves. When you see a wave approaching, wait for the wave to be 2 meters (6 feet) away, and get ready to begin your turtle roll. If the wave approaching is white water or a wave breaking in front of you, you will have to turtle roll. If the wave is just cresting or rolling through unbroken, you can continue to paddle over the wave.

5. Grab your rails and flip

To execute a proper turtle roll, grab the rails of your board with both hands firmly. Your hands should be gripping the rails directly in front of your chest. With both rails tightly grasped, roll over with the board, sinking underwater as you expose the backside of the board to the surface.

6. Extend the arms (optional)

While underwater, some surfers choose to extend their arms, which pushes the board out of the water, giving the wave room to travel in the space between your body and the extended board. This is done so that the board does not get ripped from the surfer’s hands.

7. Resurface, roll, and get back on your board

Once the wave passes over you, pull the board close to your chest and roll back onto your board. Center yourself on the sweet spot of your board and resume paddling. Be ready to repeat when the next wave breaks in front of you.

Practise in the pool at Swell
During our learn to surf course we give paddle, duck dive and turtle roll lessons in our pool, so you can praqctise the right surf technique some more.

SURF TECHNIQUE VIDEO: HOW TO DO A TURTLE ROLL WHEN SURFING


YouTube video

Next up in our learn to surf technique series

HOW TO DUCK DIVE

which surfboard is right

1. Which type of board are you riding?

If you’re riding a shortboard, and you are strong enough to completely submerge the board underwater, then you should be using the duck dive to paddle out. If you’re riding a shortboard but cannot submerge the board under the water with ease, then you should turtle roll. Both are effective, and both keep your board in control and away from other surfers.

2. Walk your board out

Just like when you’re paddling out with a longboard, when you’re riding a shortboard you must walk your board out to chest deep water before beginning to paddle. If you try to duck dive in shallow water, you could hurt yourself and damage your board.

3. Face towards the wave and paddle hard

While paddling at an angle might be a useful way to get around cresting waves. If a wave is breaking in front of you, to properly execute your duck dive you must face the wave and paddle towards it. Meaning your paddle direction should be perpendicular to the lines of waves washing to shore.

4. Spot the wave and push your board underwater

Similarly, to when you paddle out with a longboard, when you paddle out with shortboard you must constantly be looking out to sea for oncoming waves. Make sure you do not mess around and go with speed and power towards the wave. The faster you go, the faster you will come out the back on your resurface. When the oncoming wave is 2 meters away (6 feet), grab the rails (the sides) of your board and push the board under water. At this step in your duck dive, your arms should be extended with your elbows locked and your board should be completely submerged under water.

5. Use your foot

The next step in executing a perfect duck dive is to use your foot. Place your foot at the tail end of your surfboard—on your traction pad if you wave one— and submerge the tail of your board. Raise your tailbone to the sky as you plant your foot, shaping your body like a triangle, to engage your body weight effectively. Surfers typically use the foot that would be considered their “back foot” while surfing.

6. Pull yourself under

Now that your board is completely submerged underwater by three points of contact (two hands and your foot) you must submerge yourself. First take a deep breath, then pull yourself underwater towards your submerged board, to allow the oncoming breaking wave room to roll over you. If your duck dive is timed correctly, you should not feel the force of the wave as it passes over you. If you are not submerged deep enough, you may be pushed around by the wave while underwater.

7. Breaststroke kick (optional)

On particularly large days, it is challenging to execute a proper duck dive even with perfect technique. The waves are simply too powerful to get under. You will find that at the deepest point of your duck dive the wave will still reach you, and either push you down deeper underwater or wash you back towards the shore. To remedy this issue that only occurs on bigger swells, perform a breaststroke kick (or two) at the deepest point of your duck dive. This will allow you to plunge deeper underwater and avoid the force of larger and more powerful waves.

8. Resurface and repeat

Once you pull yourself to your board and execute your kicks, you will find that you will naturally rise upward to the surface the other side of the breaking wave. Center yourself on your board, wipe the hair and water out of your eyes, and paddle on, but be ready to repeat at any moment.

SURF TECHNIQUE VIDEO: HOW TO DUCK DIVE


YouTube video

SURF TECHNIQUE VIDEO: ADVANCED DUCK DIVING WITH JOHN JOHN FLORENCE


YouTube video

More videos on how to duck dive

Here at Swell Surf Camp, our surf instructors will ensure that you perfect the art of paddling out. Whether you are learning to turtle roll or duck dive, we will work with you until paddling out becomes a breeze. Our goal is for you to leave our Caribbean surf camp with enough knowledge to surf anywhere in the world!

This article on how to duck dive and do a turtle roll is part of the surf technique series for beginners.
Other articles in this series are:

Share on Facebook

SURF ETIQUETTE: THE GOLDEN RULES

THE GOLDEN RULES OF SURF ETIQUETTE

SURF ETIQUETTE RULESLearning to surf is far more than starting a new sport and acquiring the skills necessary to compete.

It’s about learning the culture, participating in the lifestyle, and having the time of your life.

However, surfing can be a bit intimidating at times, and even dangerous if done incorrectly.

We’ve all have heard stories of “surf rage” and “locals only” spots, and we’ve all seen gruesome surf injuries.

At Swell Surf Camp, we want you to be well rounded surfers that could fit in at any break in the world at the end of your surf holiday.

In order to maximize the fun, minimize the risks to yourself and others, and progress your abilities on your surf holiday, you must familiarize yourself with the surf etiquette

The Golden Rules of Surf Etiquette.

1. KNOW YOUR ABILITIES

While this may sound a tad condescending, understanding your own abilities in the water and humbly accepting them could save your life. If you’re still learning and you paddle out at an advanced wave, whether that’s a shallow reef break or any break on an overhead day, you run a high risk of injuring yourself and endangering those around you.

When you surf breaks within your ability, you can learn and progress, so that you can eventually surf more advanced breaks. When you learn to surf at Swell Surf Camp, your lessons will always be taught at breaks that reflect your ability.

One of the best things to do when arriving at the beach is to observe the waves for 10-15 minutes to make sure the surf spot is right for your abilities; just because the wave at a certain spot were great yesterday for your ability does not make it safe today.

2. PADDLE OUT WITH CAUTION

The most important thing to know when paddling out at a crowded line up is that the paddler yields to the riding surfer.

Meaning that if your paddle trajectory has you colliding with a surfer who is riding down the line of a wave, it is your responsibility to yield to that surfer, not the other way around.

In this example, Pete might be able to get back into position quicker, but he is also potentially getting into the way of the surfers on the wave. You don’t want to slalom through surfers when you are surfing. For safety and courtesy to other surfers, paddle wide of the surfers, back to the line-up, like Jim is doing in the picture.

CAUGHT INSIDE?

If paddling wide is not an option, then aim for the white water of the wave, instead of going and aiming for the easier option of the shoulder of the wave ( where the surfer is)


3. BE POLITE & SMILE

Whether you’re paddling out to a line up with 5 people out from your surf camp or 50 strangers, the rules are the same. Be polite, smile, and say hello. It will bring a feeling of levity to everyone around and it will likely put you in the good graces of local surfers.

4. UNDERSTAND PRIORITY

priority surf etiquetteNo, you’re not surfing a WSL heat, but priority still exists at every surf break. To put it simply, the surfer closest to the peak of the wave has priority over the surfer who is farther from the peak or on the shoulder. Understanding priority is key to existing peacefully in a crowded lineup.

  • The surfer who is closest to the curl, the peak or the breaking part of the wave has the right of way and priority over all other surfers;
  • The surfer who is farther outside and away from the shore has priority over all other surfers sitting or paddling on the inside, even if closer to breaking part of the wave; (This rules is often ‘abused’ by stand up paddle surfers, since they can pick the waves up further outside than regular surfers, if they get too greedy catching all the set waves, the Paddle boarder can expect the stink eye or aggro vibes from the rest of the line up)

5. DON’T DROP IN ON OTHER SURFERS

surfer etiquetteThis may seem like a no-brainer, but it happens often. A surfer is riding down the line when all of the sudden, another surfer appears on the wave and tries to hop to their feet.

Dropping in on other surfers is what usually leads to conflict in the surf world, thankfully it’s easily avoidable. It starts with understanding priority, if someone inside of you is paddling for a wave, then you shouldn’t even try to paddle for it.

Awareness plays a role as well, even if you don’t see anyone near you paddling for a wave, as you paddle look to your left and right to ensure no one is riding down the line that might have dropped on at another peak.

Being a snake – ‘snaking’

Being a snake, dropping in on others, aggressively jockeying for position in the lineup, or any other act of being a wave hog is considered rude. When you paddle out don’t immediately paddle outside past everyone else and try to get the first wave that comes in. Wait for a few waves to break first. Before you know it, the lineup will have been shuffled around a little bit and you will be in position for a wave. Just because you can catch all of the waves doesn’t mean you should (this applies especially to longboarders and stand up paddlers).


Communicate

When a wave breaks both left and right, two surfers can happily ride the same wave, just make sure to communicate by announcing if you’re going right or left, even if you think it’s obvious. A little communication in the water can do a lot to keep everyone safe and having fun.

Share

Just because you can catch every wave, doesn’t mean you should. If you’re on a large foam board or longboard that catches waves easily, it doesn’t mean you always get to take the wave from the shortboard next to you that’s looking to practice turns and airs. Always keep in mind that the ocean is for everyone and act accordingly.

6. BE CONSCIOUS OF YOUR EQUIPMENT

don't let go of surfboardMost surf injuries are not caused by the seafloor, other surfs, or wildlife, they are caused by surfboards. Surfboards are rock solid and have sharp fins, they can do some serious damage.

To avoid unnecessary injury to yourself and anyone else around you, be responsible with your board. Don’t just let go of your board when there are other surfers around you. ( in fact unless you are surfing 20′ waves, don’t ever let go of your board)

That means using a leash, not abandoning your board during your paddle out or after a wipeout. If your board is near you and you have a tight grip on the leash, or your board is under you, it won’t hurt you or any other surfer in the water.

7. KNOW THE BREAK

This is a crucial step for surfers of any level, but it is often skipped. If you’re about to surf at a new break, take a while to watch the waves. Notice where they are breaking, where the channels are, and what the current / rip tide is doing. If you can, take it a step further by asking another surfer about the spot.

Chances are, they will be helpful and tell you where to paddle out, where the peaks are, and more! At Swell, we teach you everything you need to know about our local break before we paddle out ( including Surf Etiquette)

8. RESPECT THE BREAK & BEACH

This one is obvious. Don’t litter, don’t’ leave anything behind. Pack in and pack out. You can even take it a step further and pick up any litter you might encounter. We love our local surf beach, and we do everything we can to keep it beautiful.

9. APOLOGIZE IF YOU MESS UP

We get it, accidents happen. You messed up, and that’s okay, as long as you apologize. It may seem trivial but making amends and making your intentions clear go a long way in a crowded lineup.

10. FORGIVE AND FORGET

Lastly, if someone else in the water wrongs you, if they burn you, drop in on you, or send a board flying at you, forgive and forget. No one likes to surf mad, and no one wants to be around an angry person.


TIPS FROM LAIRD HAMILTION

Be Aware. Laird Hamilton recalls, “I got run over by a guy when I was sixteen and he broke my leg. A guy ran me over with a giant longboard, and it compounded my leg, and that was one of those things that you learn, like, ’Don’t trust that the guy sees you and that they’re going to avoid you.’ Just remember that they’re probably going to run you over if you don’t watch where you’re going.”

Be Decisive. “I think the biggest mistake any beginner makes is hesitation,” says Laird. “You need to be deliberate with your actions, and if you’re going to paddle out of the way, just paddle and keep paddling. I think a real common mistake is people being indecisive in their movements, whether it’s trying to catch the wave or get out of the way.”


The above surf etiquette rules all apply for our local surf spots. At Encuentro there are 2 other rules that any traveling surfer should be aware off:

  • No Stand Up Paddle surfing (SUP) at Playa Encuentro

There are numerous off shore reefs that are ideal for Stand up paddle surfing, in and around Cabarete, so there’s no need to bring a dangerous SUP board & paddle into a lineup where there are kids and learners. Find the open spaces up and down the coast. This also applies to the new sport of foiling. Too dangerous to other surfers at our local surf spot.

  • No motorized watercrafts at Playa Encuentro.

No JetSki’s anywhere near Playa Encuentro, they are noisy, smelly and dangerous to the other surfers.

SURF ETIQUETTE VIDEO

Here’s an excellent video explaining different scenerio’s where good surfing etiquette is applied. Must watch.

YouTube video


Frequently Asked Questions

What does ‘Respect the Right of Way’ mean?

It means letting the surfer closest to the peak of the wave go first. They have the priority to ride the wave.

Why shouldn’t I drop in on others?

Dropping in on someone means taking a wave that someone else is already riding. It’s rude and can cause accidents.

How do I paddle out without bothering others?

Pick a path where you won’t get in the way of other surfers riding waves. Also, time your paddle to avoid oncoming surfers.

Why is it important to keep control of my board?

Losing control of your board can hurt you and others. Always use a leash and know when to hold onto your board or let it go.

What does being a ‘wave hog’ mean?

A wave hog is someone who takes more than their fair share of waves, leaving fewer opportunities for others. Share the waves so everyone can have fun.

How can I help protect the beach and environment?

Always clean up after yourself, don’t leave trash, and respect local wildlife. Keeping the beach clean helps everyone enjoy it.

What should I do if I make a mistake while surfing?

If you mess up, apologize to anyone affected. Owning your mistakes and making amends shows respect and keeps the vibe friendly.

Why should I be friendly and polite while surfing?

Being nice and helping others creates a positive atmosphere. A friendly lineup makes surfing more enjoyable for everyone.

Surfing is more than just a sport, it becomes ingrained in us the moment we catch our first wave. In order to enjoy surfing to its fullest potential, stay safe in the water, and share it with others, we must stick to The Golden Rules of Surf Etiquette. We have travelled to a lot of different countries and have seen 1000’s of different surf spots & one of the things that really makes our local surfing beach stand out is the mellow & friendly vibe between locals, expats and visiting surfers.

Let’s keep it that way, let’s all stick to the surf etiquette, so we can all leave the water after a surf session with a big smile on our faces.

More info: https://www.surfgirlmag.com/2018/07/surf-etiquette/
Surfing at Playa Encuentro with Swell’s Romy


YouTube video
Share on Facebook

THE BEST YOGA POSES FOR SURFING

The Best Yoga Poses for Surfers

Yoga and surfing, the two are often paired, and rightfully so, they are complementary to one another.

yoga surf holiday
Yoga surf camps are popping up all over the world and we are proud to offer Yoga surf holidays at our Caribbean surf camp.

The reality of surfing, for beginners and experts alike, is that only about 10% of our time in the water is spent wave riding. 90% of our surf is usually spent either paddling for waves or sitting waiting for waves.

While yoga will improve your balance, which will enhance your ability to ride waves, the true benefit of yoga for surfers is increased paddle strength and injury prevention.

Unlike other training methods, yoga relies completely on one’s body weight to stabilize, stretch, and strengthen the body. The result is enormous strength gains in the small stabilizing muscle of the upper back and shoulders, the same muscles we engage to paddle.

At Swell Surf Camp, we’ve created a list of The Best Yoga Poses for Paddle Strength, to give you the tools you need to prepare for your next surf holiday. Keep reading to learn the best yoga poses for surfers which will increase your paddle strength and turn you into a wave catching machine.

The Best Yoga Poses for Surfers

1. Upward Facing Dog

Upward facing dog is one of the most recognizable yoga poses out there. When done properly, Upward Facing Dog will improve posture, strengthen the arms and wrists, stretch the chest, expand the lungs, firm the buttocks, and elongates the spine and abdomen.

Upward Facing DogHow to perform Upward Facing Dog:

Begin in the pushup position or high plank position. Lower yourself down into the bottom of the pushup position while shifting your feet so that the tops of your feet are now facing the ground.

From there, lift your chest off the floor and elongate your spine with a nice slow bend as your chest rises upwards. For surfers, this pose should feel natural as it essentially mimics the first step of a good pop up.

(Read our surf instruction blog post of  ‘surf technique the pop up‘ on this page)

2. Downward Facing Dog

Downward Facing dog is another recognizable pose that engages your paddling muscles and is a great addition to any surf warm up.

Downward Facing DogHow to perform Downward Facing Dog:

Begin on the floor on your hands and knees. Your knees should be directly below your hips at the same width, your wrists should be under your shoulders at the same width.

Spread your palms, keeping your index fingers parallel. Take a breath, as you exhale, lift your knees off the floor, keeping them slightly bent. Start to raise your tailbone to the sky. As you continue to breathe, push your quadriceps back and attempt to place your heels on the ground. The pose should be done with your head, neck, and spine in line and with firm arms.

3. Bow Pose

While it may look difficult, anyone can master the Bow Pose with proper instruction. The Bow Pose strengthens your back and core while stretching your ankles, abdomen, and neck. In addition to improving your paddle strength, the Bow Pose will ease back pain and improve your posture.

bow poseHow to Perform Bow Pose:

Lay down on your stomach. Curl your legs upwards while reaching back with your hands. Grab your ankles with your hands so that your body is bent like a bow. Hold for 20 to 30 seconds.

4. Locust Pose

The Locust Pose may just seem like a simple back bend, but it can strengthen the muscles around the spine, the buttocks, and the back. Making it a useful pose for surfers for both pre and post surf yoga sessions.

surf yoga locust poseHow to perform Locust Pose:

Lay on your stomach with your arms resting at the sides of your torso and your forehead on the floor. Turn your big toes towards each other to inwardly rotate your thighs. Exhale and lift your head, upper torso, arms, and legs away from the floor.

Only your lower ribs will remain in contact with the floor below you. Raise your arms parallel to the floor, stretching them backward. Gaze forward or slightly upward to keep the base of the skull lifted and the back of the neck long. Try to hold this pose for 30 seconds to a minute.

5. Balancing Table

The Balancing Table Pose will engage your core, upper back, and shoulders, making it one of the best poses for paddle strength, coordination, and core strength.

yoga Balancing TableHow to Perform Balancing Table:

Begin on your hands and knees in the Table Pose. Inhale, and reach your right leg back, extending your toes to the direction behind you. Your leg should be parallel to the floor. Inhale once more and bring your left arm up parallel to the floor. Hold for 3-6 slow breaths, exhale as you release. Repeat on the other side.

6. Extended Puppy Pose

A variation of Downward Dog, the Extended Puppy Pose stretches the upper back, spine, and shoulders while opening the chest. This pose also aids in the release of chronic tension in the neck and shoulders, making it the perfect addition to your post-surf cool down yoga session.

yoga Extended Puppy PoseHow to perform Extended Puppy Pose:

Begin in Tabletop (on all fours, with your hips directly over your knees and your shoulders over your wrists) Rest the tops of your feet on the floor with your toes pointed straight back. As you exhale, begin to walk your hands out in front of you. Allow your chest to sink towards the floor as you slowly release your forehead to the ground.

Press your palms firmly into the mat or the ground, and roll your elbows outward, keeping your palms on the mat. On your next inhalation, deepen into the stretch by reaching your hips up and back toward the wall behind you. Continue to let your chest sink down toward the floor. Breathe deeply for 5-10 breaths, release the pose by walking your hands back to the Table Top position.

7. Cow Faced Arms

Cow faced arms will help alleviate shoulder pain, specifically any rotator cuff impingements. If you have any sharp shoulder pain after a long day of surfing, this is the pose for you.

surf yoga Cow Faced Arms How to perform Cow Faced Arms:

While seated on the floor with crossed legs, grab a towel with your right hand, inhale your right hand to the sky. As you exhale, drop your right hand towards the back of your heart and reach up with your left hand to grab the dangling towel.

Release roll out your shoulders and repeat on the left. You should feel a gentle stretch on the front of the shoulder on the arm that is behind your back. Hold the pose for 30 seconds and then switch sides.

8. Four Limb Staff Pose

The Four Limb Staff Pose builds the upper body and core strength necessary to surf successfully. Additionally, it lengthens the spine and strengthens the lower back muscles.

yoga Four Limb Staff Pose How to perform Four Limb Staff Pose:

Begin in a push-up position, with your fingers spread apart and a flat back. Exhale and keep the body in a straight line as you lower yourself downward, stopping 4-6 inches above the floor.

Bracing yourself with your weight forward above your palms, hold the position with a 90-degree bend at the elbows. Keep the shoulders at the same height as the elbows. Breath 1-4 breaths Release back into the push-up position or to a resting position on the floor.

9. Kneeling Crescent Lunge

The Kneeling Crescent Lunge will help release your tight hips after a long surf. The pose stretches the lungs, hips, neck, and abdomen.

Kneeling Crescent LungeHow to Perform Kneeling Crescent Lunge

With one foot in front of the other, begin in Warriors pose and lower the back knee to the ground. The front knee should be bent at a 90-degree angle, aligned with the ankle, the back knee should be pressed firmly into the floor. The hips are squared and pressed forward so there is a slight stretch on the hip flexors. The arms should be lifted and come together above the head, with hands together or apart.

More info (links to external websites, opens new window)

Surf & Yoga Retreat In The Caribbean

Whether you’re looking to take a surf yoga holiday or simply stay limber between paddle outs, Swell Surf Camp will give you the yoga and surf instruction you need to make the most out of your surf holiday. We offer 3 yoga classes per week for Swell clients.

surf yoga retreat

More info on the Yoga classes offered at Swell can be found on this page.

Q:I have never done Yoga before, can I join in the classes at Swell
A:Molly’s ( The Yoga Instructor at Swell)  teaching style is warm and supportive and she encourages students to explore beyond their perceived limitations by emphasising proper alignment to maximise performance and prevent injuries. You do not have to be a regular practitioner of Yoga to take and enjoy a yoga class at Swell.

Share on Facebook

SURF TECHNIQUE: THE POP UP

how to pop up surfing

SURF TECHNIQUE: THE POP UP Here is a “how to surf” tutorial on various surfing techniques which are vital when you are learning how to surf. It is not meant as a replacement for going on a learn to surf holiday (like those we offer at Swell) but rather as a reference with visuals to make learning easier. About Swell Surf Camp We offer luxury surf holiday experiences for people who want to learn how to surf in warm, Caribbean water. We focus on a structured approach in our surf lessons, taught by ISA qualified surfing instructors. Read more about the surf holidays we offer >>

HOW TO SURF: THE POP UP

  • Place hands flat on your board under your chest (see note below about hand-position)
  • Push up: Arch your back, weight on toes and hands
  • Twist your hips into a position which allows you to first move your back* foot into position
  • Move front* foot into position, place front foot between your hands
  • Stand up, keeping center of gravity low with your kness bend & looking forward
  • *your ‘back’ or ‘front’ foot is determined by whether you are ‘regular/natural-footed’ (that’s riding with the left foot forward) or ‘goofy-footed'(riding with your right foot forward).

In order to test this, have someone push you gently from behind on a flat surface (ideally when you are not expecting it). The foot which leads the step determines if you are natural/regular or goofy. If you have skateboarded or snowboarded, with surfing, you are very likely to ride with the same foot forward.


More info on the correct surf stance here >>

SURFING TECHNIQUE: TAKING OFF

dominican republic intermediate surf spots

There are various ways how to do a successful pop-up on a surfboard, below is the approach we use the most at Swell in our surf lessons at Playa Encuentro.

This approach to the pop-up is only suitable for beginners learning how to surf on big surfboards (anything over 8′ and ideally on a soft top with plenty of volume and stability). Depending on how tall you are, you might adjust your hand position further under your ribcage (imagine a pendulum) to give your feet the space to move.

For best results, this technique is best practised first on the beach, so you have extra stability, then when you have mastered it on the beach, practice in small mellow waves, like those we have at Playa Encuentro. The following images show the pop-up technique for a surfer with a “natural/regular” stance (riding with left foot forward), If you are a goofy-footer (right foot forward), the technique stays the same, just move the other foot as opposed to how it’s shown in these images.

WHERE TO PRACTICE THE POP-UP SURFING TECHNIQUE

Practise on the beach, then go out on small ‘white water’ waves. White water of about 30 to 50 cm is ideal.

Enough power to give you forward thrust. 

Pop Up Step 1

Paddle hard enough to catch the wave and feel the force of the wave pushing you forward.

As you gain speed the board gets a bit more stable. Now place both hands flat on your surfboard under your chest (don’t grab the rail of the surfboard). Some taller people find it easier to place their hands further down the chest towards the ribcage to ‘balance’ their body before moving the feet.

Step 2 Surf Pop Up

Now arch your lower back  – by doing a push-up movement.

Only your toes/feet and hands should be touching the board, look up / forward, not down at your board.

Step 3 Visual Surf Pop Up

Now slide your ‘back’ foot into position first (it sounds confusing, but this will be your left foot if you are goofy and your right foot if you are a natural-footed surfer).

The back foot should move about 35-45 cm forward. Twisting your body will make this easier as it creates space.

Step4 Surf Pop Up


Then move your front foot towards your hands staying very low to maintain balance.

Step5 Pop Up Surfing

In the final part of the pop-up, release your hands from the board but make sure to keep a low centre of gravity ( = better balance) by bending both knees; you can also extend your arms straight, one forward and one behind you to further increase your balance.

Look forward (not down!) and enjoy the glide!

SURFING POP-UP TECHNIQUE / VIDEO

YouTube video

COMMON MISTAKES WHEN PRACTISING THE POP UP

YouTube video
 

Practise on the wrong waves: the pop up technique should be practised in small white water waves, not out in the lineup (out the back) for first-time surfers. Don’t go out in big waves, or crowded surf spots.
Feet in the wrong position:
Your feet should be pretty much in the centre of the board, over stringer  (centre line made of wood in the board)
Wrong hand position: Don’t grab the rails of the surfboard, it will slow the board down and will also make  the board a lot more unstable for the push-up
Knees on the board.  A lot of beginners do this, it might make standing up on your first waves ‘easier’ but it’s a bad technique and correcting it later takes more time, so skip the knees on the board part.
Looking down: A very common mistake in people learning how to surf is to look and see what they are doing, so looking down at their feet / board / water. It make keeping your balance very difficult and you cannot see where you are going. Keep looking forward!
Too early: Don’t stand up too early. Make sure the wave is properly giving you forward momentum. Stand up too early, and the board will lose speed, you miss the wave and will fall off.
Standing too upright
. You have done all this hard work to stand on the board and now you want to stand tall! Don’t do it! By staying low and bending the knees you have a lot more stability.
Leaning over with upper body. All the bend should be in the knees, not the upper body. When you bend/lean over with your upper body, keeping your balance is practically impossible and you will fall.

Tips Use a big soft top surfboard. Sure those little boards look cool, but learning on a board that is too small will make learning to surf far harder and will take you forever. Big soft tops are stable and safe.
Practise on the beach.
Before going out in the water, practise 15-20 pop ups on the sand.
Watch other surfers.
See how they do it.

Ask for feedback. Ask your surf instructor for tips.

Stay positive. As easy as some surfers make it look, learning to surf is not easy! Don’t get discouraged when you make mistakes, we were all beginners once. Once you have mastered the surfing pop up on a longboard you can start trying the technique on smaller boards.

SIMULATING WAVE CONDITIONS

To make your practice even more effective, try simulating wave conditions:

  • Use a balance board or a Bosu ball to mimic the instability of a surfboard on water.
  • Practice your pop up on these unstable surfaces to improve your balance and coordination.
  • This will help you get used to the feeling of popping up on a moving wave.

By incorporating these dry land drills into your routine, you’ll be well on your way to mastering your surfing pop up!

The video below shows how the top pros do their pop up in slow motion on a shortboard at the Surf Ranch.

HOW TO SURF: THE POP UP

YouTube video

Here is another good instructional video of the do’s and don’t to mastering the pop up surf technique


SURF TECHNIQUE POP UP VIDEO

YouTube video
 

TIPS FOR A BETTER SURFING POP UP

The following tips will take your surfing pop-up to the next level and keep you eager for more waves.

The Right Surfboard

Choosing an appropriate surfboard is key to achieving a successful pop-up. For those just starting, it’s often suggested to use longboards because their larger size enables your feet to remain on the tail of the board, simplifying the process of standing up.

Conversely, shortboards offer more difficulty as they necessitate your feet to extend off the tail, demanding extra exertion during the pop-up process. To simplify this choice for those just starting, models such as Mr Whippy and Big Squid are excellent options.

These boards make the learning process more manageable and ensure that new surfers can get the hang of popping up effectively without being hindered by equipment unreliable for their skill level or physical capabilities—transitioning effectively into surf training will be a far smoother experience with these fundamental elements established.

surfer holiday

Effective Surf Training

Effective surf training focuses on building the necessary strength and skills for a better pop-up. Practising pop-ups on the floor can greatly improve muscle memory and arm strength.

This type of exercise mimics an explosive push-up, which is crucial for popping up swiftly on your board in the water. It’s like preparing your body ahead of time for what it will need to do once you’re surfing.

For those looking to perfect their technique, following a specialized program such as the “Fix Your Pop Up Program” can offer detailed assessments and personalized strength training plans.

This approach ensures that each surfer works on specific areas needing improvement, leading to more effective results in their pop-up performance.

Correct Take-off Angles

Mastering the right take-off angles can determine whether you smoothly catch a wave or end up tumbling in the white water. Position yourself at the back of your board to effectively use the wave’s energy for popping up.

This situation helps you lift yourself with less effort as you prepare to stand. But be mindful, that too much weight on the front might accelerate things at first but could lead to nose-plunging into the water Conversely, keeping more weight at the back improves control and stability during manoeuvres but may reduce your pace.

Keeping your weight balanced in the centre of the board is crucial during paddling to maintain good speed and manoeuvrability. This equilibrium enables you to paddle effectively while positioning yourself ideally for catching waves with optimal momentum.

Following this, we’ll explore the topic of finding your stance on the surfboard.

Finding Your Stance

Discovering whether you’re a goofy or regular-footer is crucial for a solid pop-up. If your right foot naturally falls to the back of the board near the tail, with your left foot leading near the centre, you’re surfing with a regular stance.

On the flip side, if it feels more comfortable to have your left foot at the back and your right foot forward, then goofy is your go-to stance. This isn’t just about what feels natural; it’s about setting up for balance and control on waves.

surfing stance

Your feet should stand shoulder-width apart once you’ve popped up. This setup isn’t random—it’s essential for shifting weight effectively to keep the surfboard flat and responsive underfoot.

Stance plays a big role in how well you navigate the surf, turning theoretical knowledge into practical skill as soon as you hit the water.

Proper Hand Placement

After finding your stance, focusing on proper hand placement becomes crucial. Place your hands flat on the surfboard at ribcage level, making sure they are spaced about board width apart.

This position provides stability and control as you prepare to pop up. Keeping your hands correctly aligned helps in generating the necessary force for a swift and balanced lift off the board.

Transition smoothly into a standing position by bringing your front foot under your body right to where your hands were placed, without letting your knees touch the board. Make sure both feet leave the board simultaneously and land back down in one fluid motion.

This technique ensures a solid base for balancing in a low, bent-knee stance with arms outstretched for balance while keeping your gaze forward, ready to ride the wave ahead.

Using Visualization Techniques

Once you’ve mastered proper hand placement, turning your attention to visualization techniques can further enhance your surfing pop up. Visualization is like a secret power that helps you see and feel each move before hitting the waves.

Picture yourself paddling into the wave, popping up smoothly, and riding with perfect balance. This mental practice guides your body through the motions even when you’re not in the water.

It’s all about focusing on where you want to go and seeing yourself succeed in achieving that perfect stance with your knees bent for stellar balance.

Practising visualization also means improving your wave reading skills without getting wet. Imagine analyzing a wave’s shape, speed, and direction, then visualize timing your pop-up flawlessly.

This technique isn’t just daydreaming; it’s an effective way to cement muscle memory and boost confidence on real waves. Every successful ride begins in your mind’s eye – by vividly conjuring every detail of a well-executed pop-up, you prime yourself for actual success out in the surf.

top surfing tips

Importance of Surf Skating

Surf skating significantly boosts movement flexibility and technique mastery, which are fundamental for executing an efficient pop-up in surfing. It reproduces the actions and demands of surfing on solid ground, offering a convenient means to hone pop-up skills outside of the water.

This technique strengthens confidence and muscle memory, setting surfers up for authentic wave scenarios. By paying attention to this part of the training, surfers can increase their nimbleness and reaction speed in the water.

Including surf skating in habitual training paves the way for a personal evaluation of physical constraints while actively striving to augment strength and flexibility. Establishing a persistent practice routine with surf skating can immensely strengthen one’s potential to become adept at the surf pop-up.

This strategy assists in conquering technical obstacles, and it significantly contributes to understanding wave patterns through amplified balance and stance modifications.


FREQUENTLY ASKED QUESTIONS

Why is the pop-up so important in surfing?

The pop-up is crucial because it sets the foundation for your entire ride. A smooth and quick pop-up helps you maintain balance and control, making it easier to catch and ride waves.

How can I practice my pop up at home?

You can practice your pop-up at home by using a strip of tape on the floor to simulate your surfboard. Perform the pop-up motion repeatedly, ensuring your feet land correctly on the tape each time.

What are common mistakes to avoid during the pop-up?

Common mistakes include using your knees to help you stand, incorrect foot placement, and rushing the popup. Avoiding these errors will help you improve your technique and ride waves more effectively.

 I’m having trouble with my balance during a surf pop-up; any advice?

Ah, the classic wobble! It’s common to struggle with balance in the beginning. Try widening your stance or shifting your weight more towards the center of the board – you’ll be popping up like a pro in no time!

Are there specific exercises that can help me master a better surfing pop up?

Absolutely! Strength training exercises targeting core muscles can be beneficial since these are crucial for maintaining balance during a surf pop-up. Yoga poses such as plank or downward dog can also help.

How important is timing when doing a surf pop-up?

Timing is everything in surfing! If you’re too early or late with your popup, catching that wave might remain just a dream instead of becoming an exhilarating reality.


how to generate speed We hope we made it as clear as possible for you. But feel free to send us a message if something is not clear, or if you want to join us in the Caribbean for a learn how to surf holiday, where our qualified surfing instructors teach you the above steps, and will help you with any questions you might have.

ABOUT SWELL SURF CAMP

Located on the scenic north coast of the Dominican Republic is our purpose-built surf resort

We cater for surfers of all levels, from beginners to expert surfers who are looking for an active surf holiday

Swell offers full surf package holidays

Share on Facebook

CHOOSING THE RIGHT SURFBOARD

Choosing the right surfboard

CHOOSING THE RIGHT SURFBOARD

So you’ve have had your first experience of riding waves and standing up on a surfboard and you want to take things to the next level, getting your own surfboard to continue surfing at home or to take on another surf trip.

Too much choice?

Off you go to your nearest surf shop, or perhaps you’re looking online: You’re full of enthusiasm with the thought of treating yourself to a lovely new board.

But you are confronted with an overwhelming sight: 400 different types of surfboards, in all different shapes and sizes!  Picking the right board might not be quite such an easy task after all and the pressure to make the right choice and avoid an expensive mistake can be stressful!

We see far too many people go and buy a ‘standard‘ short board, thinking ‘all good surfers are riding them, so it must be the right surfboard for me too’. The reason why many people end up buying a shortboard (too early) is that the experts make surfing on a short board look so easy; definitely a lot easier than getting through the lineup with a bigger and heavier board.  In reality, many of those guys and gals who look so cool carrying a teeny-weeny shortboard around, aren’t actually catching any waves!

So…….

“What’s the right surfboard for me?”

One of the most important aspects when buying a new surfboard is to be totally honest with yourself about your fitness level and surfing ability.  Getting on shortboard too early is not going to make your progress quicker at surfing, quite the contrary; you will find it a lot harder to catch the waves with a board that doesn’t have the correct volume to float you properly.

“If you can’t catch the wave, you ain’t going to improve your riding”

Catching lots of waves is the key to making good progress.

Below we have highlighted some of the more common surfboard shapes and talk you through each of their individual characteristics.

which surfboard is right

TOW BOARD

The tow in board started to appear in video’s with Laird Hamilton riding monster waves in Hawaii; their general use is uncommon.
Characteristics: Small, with foot-straps to stay in contact with the board in heavy chop.
Lenght: 4’8 to 6’2′
Fins: 3 or 4 fin setup
Good for: Expert surfers, who want to get towed into very big waves.
At Swell: We do not have tow in boards at Swell.  Jet ski’s and motorised watercraft are not allowed near Cabarete bay or Playa Encuentro


FISH SURFBOARD

Originally the fish was used in the 60’s and 70’s but the design made a come-back in recent years.
Characteristics: Short (usually ridden 6 or so inches less than a standard shortboard), also wide and reasonably thick, so relatively good amount of volume. Has a ‘swallow tail’
Length: 5’2 to 6’4′
Fins: 2 big ‘keel’ fins or 4 fins
Good for: Surfers who want an alternative way of riding waves.  The fish is renowned for use in smaller, mushier waves, but can also be great in larger waves.  They tend to have more volume than a regular shortboard, so it makes paddling easier and getting into the wave easier too.
At Swell: We have a couple of fish boards at Swell in our rental pool, they work well in the mellow summer waves & as an alternative to a longboard.

shortboard surfingSHORTBOARD

The standard shortboard evolved from the fish surfboards in the 80’s when Simon Anderson invented the 3 fin thruster set up
Characteristics: Versatile board that works in a variety of waves. Quick to maneuver and generates speed very fast
Length: 5’8 to 6’8′
Fins: 3 fin or 4 fin (quad) set up
Good for: Advanced surfers who want to perform speedy, sharp bottom turns and ‘off the lip’ manuevers + many more tricks.
At Swell: We have a couple of standard shortboards in the rental pool between 6’4′ and 6’8′ for advanced surfers. Works best in winter time when the waves are bigger and have more power.

HYBRID

‘In-between board’ for people that want the maneuverability of a shortboard, but the wave catching ability of a bigger board. Good all-round board or a board to narrow the gap between a bigger board and a shortboard
Characteristics: Scaled up version of the standard shortboard, wider and with more volume to make paddling/wave catching easier.
Lenght: 6’6′ to 7’2
Good for: People who want to make the transition to a shorter board; intermediates.
At Swell: We have some hybrid surfboards in our rental pool.

MINI GUN SURFBOARDMINI GUN (OR STEP UP)

Bigger boards for bigger waves.
Characteristics: Longer than a shortboard, narrower and normally a round or pin tail for speed.
Length: 6’6 to 8’0
Good for:Surfers who want to get barrelled in fast and big waves. Mostly used in Australia, Hawaii and Indonesia
At Swell: We have one 6’6′ step up, but it rarely gets used.

EGG SURFBOARDEGG

Popular design from the 60’s and 70’s; looks like a mini-mal but is more performance-orientated.
Characteristics: Narrower in the nose than a mini-mal and usually also has less volume
Length: 7’6 to 8’2′
Fins: 1 or 3
Good for: Surfers who want a more retro-surfing experience
At Swell: We have one egg in our rental pool.

MINI MALMINI MAL

Smaller version of the longboard, little less volume
Characteristics: A bit less ‘glide’ than a longboard, but more maneuverability
Length: 7’6 to 8’2′
Good for: Cruisey-style of surfing for slow & small waves
At Swell: We have a large range of mini-mals at Swell, from NSP and Torq Surfboards, and they fit the surfing conditions of Playa Encuentro perfectly.

LONGBOARDLONGBOARD

The original 60’s longboard is still very popular.  For learning, these boards have more volume and are covered in a soft EVA deck, for safety and added volume.
Characteristics: Great wave-catching ability, long glides, work best in waves that are not too steep
Length: 9’0 to 9;6

DIFFERENT LONGBOARD SHAPES

which surfboard is right
Good for: Surfers who are after a long, cruisey-glide; this is a board that catches a lot of waves
At Swell: We have several long boards in our rental pool, from high performance boards to beginner soft-tops in the 9’0 range.

BIG WAVE GUNBIG WAVE GUN (aka. RHINO CHASER)

A scaled-up version of the mini-gun
Characteristics:  Very long & narrow
Length: 9’0 to 11’6
Good for: Surfers who want to catch the biggest waves without the help of a jet ski, then this is the board you need.  It is strictly speaking a long board but should not to be mistaken for the kind of longboard most people would want: Just because it’s long does not make it a good board for learning to surf, or for those cruisey-rides in small surf.
At Swell: No need for a big wave gun at Swell,  the waves in the Dominican Republic never get the size that a board like this is needed


Conclusion: There is no one-size-fits-all for surfboards.

To make sure that you buy the right surfboard: talk to a couple of different surf shop owners or local surfboard shapers, and be honest about your goals and current skill set. Renting a board  (or borrowing from a friend) is also a good way of finding out if the board is right for you.

To get a guide on what is the right amount of volume for your next surfboard, check this chart

Surf Volume Weight Chart

At Swell, we have a large variety of surfboards, so Swell clients can change boards during their stay and experience the different feel of each surfboard.
More information on our surfboards can be found here.


QUESTIONS

No results!
  • HOW DO I KNOW WHAT SURFBOARD VOLUME IS RIGHT FOR ME?

    The right surfboard volume depends on your weight, fitness level, and surfing ability. Higher volume boards provide better flotation and wave-catching ability, making them ideal for beginners and intermediate surfers. Lower volume boards offer more maneuverability but require better technique and fitness. When choosing a board, prioritize catching lots of waves over looking cool with a smaller board - wave count is key to improving your surfing skills.

  • HOW DO FIN SETUPS AFFECT SURFBOARD PERFORMANCE?

    Different fin setups dramatically impact how a surfboard performs in the water. Single fin setups (common on longboards and eggs) provide smooth, flowing rides with less drag but limited maneuverability. The classic 3-fin thruster setup, invented by Simon Anderson in the 1980s, offers the best balance of control, speed, and maneuverability for most conditions. Fish boards typically use either 2 large "keel" fins or a 4-fin setup, which provides speed and drive in smaller waves. Quad (4-fin) setups generate more speed and work well in both small and large waves, while offering a looser, more skateboard-like feel compared to thrusters.

  • WHAT IS A HYBRID SURFBOARD AND WHO SHOULD USE IT?

    A hybrid surfboard (6'6" to 7'2") is an "in-between board" that combines the maneuverability of a shortboard with the wave-catching ability of a larger board. It's essentially a scaled-up version of a standard shortboard - wider with more volume to make paddling and wave catching easier. Hybrid boards are perfect for intermediate surfers wanting to transition from a larger board to a shortboard, offering a good all-around performance.

  • WHEN SHOULD I CONSIDER USING A MINI-GUN OR STEP-UP SURFBOARD?

    A mini-gun or step-up surfboard (6'6" to 8'0") is designed for bigger waves and more challenging conditions. These boards are longer than shortboards but narrower, typically featuring a round or pin tail for increased speed and control. They're primarily used by experienced surfers in locations with fast, powerful waves like Australia, Hawaii, and Indonesia. If you're surfing consistently overhead waves with significant power, a step-up board can provide the stability and paddle power needed for these conditions.

  • WHAT'S THE DIFFERENCE BETWEEN A SHORTBOARD AND A FISH SURFBOARD?

    A shortboard (5'8" to 6'8") is the standard performance board that evolved from fish surfboards in the 1980s. It features 3 or 4 fins and is designed for advanced surfers wanting quick maneuverability and speed. A fish surfboard (5'2" to 6'4") is typically ridden 6 inches shorter than a standard shortboard but is wider and thicker with more volume. Fish boards have a distinctive swallow tail and work exceptionally well in smaller, mushier waves while being easier to paddle than regular shortboards.

  • WHAT MAKES LONGBOARDS BETTER FOR LEARNING TO SURF THAN SHORTBOARDS?

    Longboards (9'0" to 9'6") are superior for learning because they offer exceptional wave-catching ability and stability due to their high volume and length. Unlike shortboards that require precise technique and timing, longboards provide a forgiving platform that allows beginners to focus on fundamental skills like paddling, positioning, and standing up. The extra foam and surface area make it easier to catch waves in various conditions, and the stable platform reduces the learning curve significantly. Many learning-focused longboards also feature soft EVA deck padding for added safety and comfort during the learning process.

  • WHAT WAVE CONDITIONS WORK BEST FOR DIFFERENT SURFBOARD TYPES?

    Each surfboard type is optimized for specific wave conditions. Fish surfboards excel in smaller, mushier waves where their width and volume help generate speed, though they can also perform well in larger surf. Shortboards work best in steeper, more powerful waves that allow for quick, sharp maneuvers and high-performance surfing. Longboards and mini-mals are ideal for smaller, less steep waves where their glide and wave-catching ability shine. Mini-guns and step-ups are specifically designed for bigger, faster waves where extra length provides the paddle power and speed needed to catch and ride powerful surf safely. Hybrid boards offer versatility across a wider range of conditions, making them excellent all-around choices.

  • SHOULD I BUY OR RENT A SURFBOARD WHEN STARTING OUT?

    Renting or borrowing surfboards is highly recommended when starting out, as it allows you to experience different board types and find what works best for your style and ability level. Visit multiple surf shops and speak with experienced surf shop owners or local shapers - be honest about your goals and current skill set. This hands-on approach helps you avoid expensive mistakes and ensures you choose the right board when you're ready to purchase. There's no one-size-fits-all solution for surfboards, so testing different options is crucial.

  • WHAT TYPE OF SURFBOARD SHOULD A BEGINNER CHOOSE?

    Beginners should choose a longboard (9'0" to 9'6") or mini-mal (7'6" to 8'2") with high volume and stability. These boards offer excellent wave-catching ability and are often covered in soft EVA deck material for safety. The key is being honest about your fitness level and surfing ability - avoid the temptation to buy a shortboard too early, as insufficient volume will make it much harder to catch waves and slow your progression. Remember: if you can't catch the wave, you won't improve your riding.

ABOUT SWELL SURF CAMP

Located on the scenic north coast of the Dominican Republic is our purpose-built surf resort

We cater for surfers of all levels, from beginners to expert surfers who are looking for an active surf holiday

Swell offers full surf packages holidays

If you have any questions about this article, send us an email with your thoughts, and feel free to share it on your favourite social media site.


Share on Facebook

WHAT SURFBOARD SHAPE IS RIGHT FOR YOU?

WHAT SURFBOARD SHAPE

WHAT SURFBOARD SHAPE IS RIGHT FOR YOU?

It’s no longer mainstream to ride only high-performance shortboards. In fact, it’s no longer mainstream to ride anything mainstream. Today, at any given lineup you will, of course, find your standard shortboards, but you will also be met with a plethora of fun size crafts, grovelers, twin fins, stand up paddle boards, soft tops, and even foils. The recent eruption in popularity of the alternative surf craft has done wonders for the advancement of fun, which is what surfing is really all about.

There’s no point in trying to force your 6’0” leaned out thruster to go on a two-foot day. There’s no fun involved in stomping repeatedly down the face of a wave with your front foot, only to have the wave close out on you because you couldn’t make the section. Riding boards that are designed for the waves you’re actually riding will increase your fun levels tenfold, especially when you have the ideal board for your skill level.

LONGBOARD

A longboard is anything 9 feet and over. Traditionally, longboards have single fins, but now it is common to see longboards with a “two plus one” set up. Meaning two thruster style fins with a traditional large single fin in the middle.

Longboards are truly an every man’s tool. All surfers start out on them, they’re excellent for learning. But plenty of advanced surfers choose to ride longboards as well.

SKILL OF RIDER
As previously mentioned, longboards are the perfect option for beginners. Ideally, a first-time surfer will start out on a soft top, and then progress to a traditional longboard. Longboards are also a great option for advanced surfers who enjoy cruisy rides and want to improve their style. Nothing is more stylish than a skillful long boarder cross stepping his or her way to the noise of their board.

OPTIMAL WAVE TYPE AND SIZE
While a truly talented longboarder will take out their trusty log no matter if its 6 inches or 6 feet, most of us turn to longboards when the surf is just a bit too small for a traditional shortboard. Longboards make even the most petite swells enjoyable and riding a longboard (or any board that will increase your wave count) will help improve your understanding of wave mechanics.

Longboard

WHAT TO EXPECT While riding a longboard, you can expect long, cruisy, drawn-out lines. You will also have the ability to catch and ride small waves that would otherwise be considered uncatchable.

LONGBOARD SURFING VIDEO

YouTube video

FUN SHAPE

funshape surfboard

Fun shape boards are called fun size for a reason, they make what would be otherwise dull surf amusing. A fun size board is high in volume, wide, and has thick rails. A fun size board stands anywhere from 6’6” to 8’6” in height. One of the most popular fun size shapes is the egg shape, which is often called the “mini-Malibu for its similarities to a longboard.

SKILL OF RIDER

Fun shape boards are a great option for beginner surfers who are looking to progress towards a smaller board. If you have mastered the popup and you can ride clean lines down the face of the wave, then a fun size board will be a great fit for you. Similar to longboards, fun shape boards will give intermediate and advanced surfers a thrill on relatively small days.

OPTIMAL WAVE TYPE AND SIZE

As stated earlier, fun size boards can make a relatively small wave day a lot of fun. That being said, there are a select number of surfers who ride mid-size boards on hollow, barreling days.

Surfing (2)

WHAT TO EXPECT

Fun size boards offer a similar feel to longboards, with a bit of added performance. Long cruisy rides are met with increased maneuverability that is made possible by the reduced length of the board. Fun size boards offer beginner surfers a chance to begin to learn to carve and turn in the same vein as you would on a shorter board, while still providing plenty of stability.

GROVELER 

groveler surfA groveler may appear to be just a standard shortboard, but upon closer inspection, you will find that a groveler is typically shorter and stubbier than the average high-performance shortboard. What this means is that while grovelers may be ridden at a reduced length, they have an increased width, thickness, and therefore more volume than normal shortboards.

SKILL OF RIDER

A groveler should be part of every surfer’s quiver, whether they are just starting out or they are a sponsored pro. Grovelers serve as a longboard replacement during the small waves of the summer season or any small day for that matter. The increased volume in a groveler allows the board to paddle easily and catch virtually any sized wave. Grovelers are also a great stepping stone for beginner/ intermediate surfers to advance their surfing. The high volume of a groveler will provide more stability than a high-performance shortboard, making them a valuable step in surf progression.

OPTIMAL WAVE TYPE AND SIZE

Grovelers excel in small waves. 2-4 feet is where you will get the most out of a groveler. Most grovelers are too thick to perform well on large waves with steep faces. There are a few exceptions of course if a groveler has a slight entry rocker and a thinned-out tail (such as the Hypto Krypto by Hayden Shapes) then they may be able to perform in larger surf.

Surf Techniques

WHAT TO EXPECT

As stated above, a groveler will make mushy, small surf more enjoyable. The increased volume allows you to catch more waves with ease. The relatively flat rocker of a groveler gives the board plenty of speed through flat/ closeout sections that would otherwise be difficult to get around. Grovelers will be a tad more cruisey than a high-performance shortboard but will still offer the necessary thrills of performance when the surf is less than ideal.

FUN SHAPE / MID LENGHT SURFING VIDEO

YouTube video

FISH

fish surfboardThe fish is an immensely popular shape that has been around since the 1970s. Fishes have a few defining characteristics that separate them from normal shortboards or grovelers. The most notable characteristics of a fish are the wide swallowtail and the twin fin (often keels) set up. Fishes also tend to have a lot of volume under the chest and somewhat flat rockers.

SKILL OF RIDER

Like the groveler, the fish will bring an ample amount of fun to any surf session. The classically drawn outlines of the swallow-tailed twin fin are some of the most stylish in surfing, making fishes popular with intermediate and advanced surfers. That being said, the fish has similar characteristics to the groveler, making it an equally as viable option for progression for those beginner/ intermediate surfers who are looking to improve.

OPTIMAL WAVE TYPE AND SIZE

Similar to any groveler, a fish will turn any small day session into something to remember. Few surfers choose to ride fishes on large days, in part due to their large wide noises, which make steep drops challenging.


FISH SURFING VIDEO

YouTube video

WHAT TO EXPECT

On a fish, you can expect long cruisy lines, plenty of speed, and a loose, skatey feel. A fish may not be able to bank turns like a high-performance shortboard, but when they’re ridden well they sure are fun to watch.


HIGH-PERFORMANCE SHORTBOARD

High-performance shortboards vary in size from about 5’4” to 6’8.” They are designed for one thing and one thing only, to turn on a dime and make the absolute most out of the open face of a wave. A good high-performance shortboard will allow surfers to fit as many turns possible into a wave while maintaining speed and control.

SKILL OF RIDER

High-performance shortboards have thin rails, pointed noises, and low volume. They take time and patience to master, meaning that only advanced surfers will truly have a good time on them.

OPTIMAL WAVE TYPE AND SIZE

There needs to be a bit of size for a high-performance shortboard to truly shine. If the surfer is 4 feet or over, then it is time to grab your trusty shortboard.

WHAT TO EXPECT

High-performance shortboards are generally thin, with low rails, and rockered out. This gives them the ability to turn on a dime and carve up and down the face of a wave with ease. If you’re riding a high-performance shortboard for the first time, expect to work a lot to generate speed and set up each manoeuvre, but know that if you get that cut back just right, it will feel amazing.

WHAT SURFBOARD SHAPE IS RIGHT FOR YOU?

There is no right or wrong in the surfboard shape you choose, our advice is to try out the different surfboard shapes in various conditions and see which one suit your style and surfing ability best. Or don’t choose and mix and match boards to the right conditions or state of mind you are into. Some days are better for glide or speed, others are better for a high-performance approach. Whatever you do, make sure to have fun, since that is essentially what surfing comes down to.; putting a smile on your face.

At Swell, we have an extended surfboard rental pool for people that already know how to surf and don’t want to travel to the Dominican Republic with their surfboard. Our range exists of 25+ boards ranging from 5’10’ fishes to 9’6′ performance longboards and everything in between. Never surfed before? Have a look at the learn to surf and surf coaching packages we offer Surfboards for beginners we have too. Links and resources: Mollusk surfboards sell some of the best looking ‘alternative’ surfboards. Channel Islands is one of the leading manufacturers of high-performance shortboards


QUESTIONS

No results!
  • HOW DO I KNOW WHAT SURFBOARD VOLUME IS RIGHT FOR ME?

    The right surfboard volume depends on your weight, fitness level, and surfing ability. Higher volume boards provide better flotation and wave-catching ability, making them ideal for beginners and intermediate surfers. Lower volume boards offer more maneuverability but require better technique and fitness. When choosing a board, prioritize catching lots of waves over looking cool with a smaller board - wave count is key to improving your surfing skills.

  • HOW DO FIN SETUPS AFFECT SURFBOARD PERFORMANCE?

    Different fin setups dramatically impact how a surfboard performs in the water. Single fin setups (common on longboards and eggs) provide smooth, flowing rides with less drag but limited maneuverability. The classic 3-fin thruster setup, invented by Simon Anderson in the 1980s, offers the best balance of control, speed, and maneuverability for most conditions. Fish boards typically use either 2 large "keel" fins or a 4-fin setup, which provides speed and drive in smaller waves. Quad (4-fin) setups generate more speed and work well in both small and large waves, while offering a looser, more skateboard-like feel compared to thrusters.

  • WHAT IS A HYBRID SURFBOARD AND WHO SHOULD USE IT?

    A hybrid surfboard (6'6" to 7'2") is an "in-between board" that combines the maneuverability of a shortboard with the wave-catching ability of a larger board. It's essentially a scaled-up version of a standard shortboard - wider with more volume to make paddling and wave catching easier. Hybrid boards are perfect for intermediate surfers wanting to transition from a larger board to a shortboard, offering a good all-around performance.

  • WHEN SHOULD I CONSIDER USING A MINI-GUN OR STEP-UP SURFBOARD?

    A mini-gun or step-up surfboard (6'6" to 8'0") is designed for bigger waves and more challenging conditions. These boards are longer than shortboards but narrower, typically featuring a round or pin tail for increased speed and control. They're primarily used by experienced surfers in locations with fast, powerful waves like Australia, Hawaii, and Indonesia. If you're surfing consistently overhead waves with significant power, a step-up board can provide the stability and paddle power needed for these conditions.

  • WHAT'S THE DIFFERENCE BETWEEN A SHORTBOARD AND A FISH SURFBOARD?

    A shortboard (5'8" to 6'8") is the standard performance board that evolved from fish surfboards in the 1980s. It features 3 or 4 fins and is designed for advanced surfers wanting quick maneuverability and speed. A fish surfboard (5'2" to 6'4") is typically ridden 6 inches shorter than a standard shortboard but is wider and thicker with more volume. Fish boards have a distinctive swallow tail and work exceptionally well in smaller, mushier waves while being easier to paddle than regular shortboards.

  • WHAT MAKES LONGBOARDS BETTER FOR LEARNING TO SURF THAN SHORTBOARDS?

    Longboards (9'0" to 9'6") are superior for learning because they offer exceptional wave-catching ability and stability due to their high volume and length. Unlike shortboards that require precise technique and timing, longboards provide a forgiving platform that allows beginners to focus on fundamental skills like paddling, positioning, and standing up. The extra foam and surface area make it easier to catch waves in various conditions, and the stable platform reduces the learning curve significantly. Many learning-focused longboards also feature soft EVA deck padding for added safety and comfort during the learning process.

  • WHAT WAVE CONDITIONS WORK BEST FOR DIFFERENT SURFBOARD TYPES?

    Each surfboard type is optimized for specific wave conditions. Fish surfboards excel in smaller, mushier waves where their width and volume help generate speed, though they can also perform well in larger surf. Shortboards work best in steeper, more powerful waves that allow for quick, sharp maneuvers and high-performance surfing. Longboards and mini-mals are ideal for smaller, less steep waves where their glide and wave-catching ability shine. Mini-guns and step-ups are specifically designed for bigger, faster waves where extra length provides the paddle power and speed needed to catch and ride powerful surf safely. Hybrid boards offer versatility across a wider range of conditions, making them excellent all-around choices.

  • SHOULD I BUY OR RENT A SURFBOARD WHEN STARTING OUT?

    Renting or borrowing surfboards is highly recommended when starting out, as it allows you to experience different board types and find what works best for your style and ability level. Visit multiple surf shops and speak with experienced surf shop owners or local shapers - be honest about your goals and current skill set. This hands-on approach helps you avoid expensive mistakes and ensures you choose the right board when you're ready to purchase. There's no one-size-fits-all solution for surfboards, so testing different options is crucial.

  • WHAT TYPE OF SURFBOARD SHOULD A BEGINNER CHOOSE?

    Beginners should choose a longboard (9'0" to 9'6") or mini-mal (7'6" to 8'2") with high volume and stability. These boards offer excellent wave-catching ability and are often covered in soft EVA deck material for safety. The key is being honest about your fitness level and surfing ability - avoid the temptation to buy a shortboard too early, as insufficient volume will make it much harder to catch waves and slow your progression. Remember: if you can't catch the wave, you won't improve your riding.

SURF VIDEO SURFBOARD TEST

YouTube video

Interested in changing your life to see the health benefits of learning to surf?

learn to surf holiday


Share on Facebook